
Immunohistochemistry Refresher Webinar
Immunohistochemistry Refresher Webinar
- Applications for IHC
- Antigen retrieval
- How to best choose your antibodies for IHC
- General IHC protocol with technical tips
- The proper controls for validation of results
- Troubleshooting classic problems
Video Transcription
Hi everyone, welcome to our webinar series, Back to the Lab webinar series. My name's Rebecca Northeast and I have recently just joined Proteintech as a technical specialist coming from the University of Manchester as a postdoctoral researcher in metabolism, and that was following a Ph.D. in neuroscience. I did a lot of IHC for my research, so I am pleased to talk to you today about some tips and tricks, helping you get back to the lab with confidence following these unfortunate breaks. Just going to wait a little bit more for some more people to attend, but we'll get started in a minute. And while I'm talking, if you have any questions, feel free to leave them in the question section and my colleague, Will, will answer them as I'm going along. Or if he hasn't had time to answer them, I'll answer them at the end.
Okay, so let's get started. So, just going to briefly go over the agenda for today's talk. We're going to start with an introduction to the company and an introduction to immunohistochemistry, looking at the applications of IHC, the considerations that we need to take into account before we start any experiments, a brief overview of the general protocol, how we choose the best antibodies for our research, as well as looking at the correct controls that we want in order for our results to be valid, before finally looking at some troubleshooting of common issues with IHC. So most of you will probably already know Proteintech, but if you don't, here's our company introduction, and I promise it won't take long. We are the original manufacturer of antibodies and have been since... sorry, we have been the original manufacturer of antibodies since 2002, and we recently became ISO accredited, which means that we can manufacture GMP-grade cytokines and growth factors for use in cell lines in gene therapies. We have five global inventory sites and all of our products are in stock and available for next day delivery.
Introduction to Proteintech
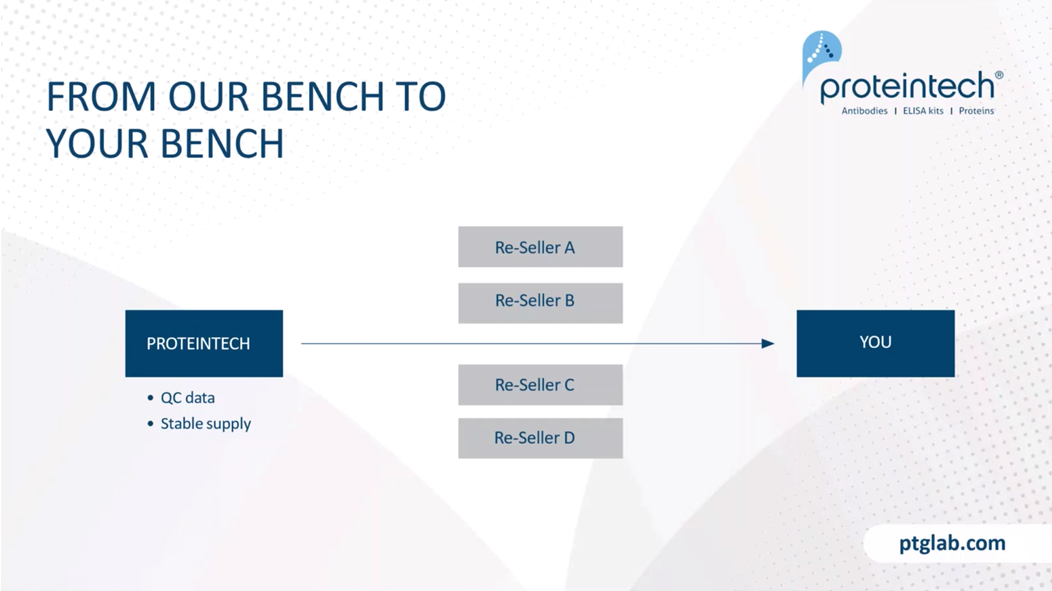
The main difference between Proteintech and other antibody suppliers is that we manufacture every product ourselves and you can only buy our products with our label on it. By cutting out the middleman and not allowing anyone else to sell our products under their label, we offer you complete transparency. And this means more lot to lot consistency because we can guarantee supply in addition to our huge library of original validation data direct from the lab, thus having complete quality control over antibodies and making sure it works in your hands. Proteintech has polyclonal and some monoclonal antibodies against 13,000 targets. Within that, antibodies against two and a half thousand of these targets have had their specificity verified by knockdown or knockout validation. And this is the broadest coverage of KD/KO validated antibodies in the industry.
This year, we launched CoraLite fluorescent-dye conjugated antibodies for use in direct immunofluorescence and protein ladders for use in Western blots. As a company, we measure our success by your scientific success, specifically helping you publish impactful research faster. This graph shows that over our company history, our products are featuring and more and more publications each year. As of today, we have over 65,000 publication citations, and I hope that this webinar and our series of refresher talks this week can help you to become a published researcher using Proteintech products.
1. Introduction to IHC
So back to the talk. What is immunohistochemistry? Immunohistochemistry simply refers to the binding of an antibody to an antigen within tissues. So here you can see a paraffin-embedded human ovary tumor tissue, which is stained for PAX8, which is a common tumor marker. IHC has been around for a while. It was first described in 1983, actually, but the first reported study was by Coons et al in 1942, which used FITC-labeled antibodies to identify Pneumococcal antigens in infected tissue. So what are the applications of immunohistochemistry?T these can be used to diagnose disease, looking at histopathological tissue, we can look at prognostic markers within cancers, and these can help identify any tumor-specific antigens and allows clinicians to define a tumor as whether it's benign or malignant. It can also be used to diagnose tumors of uncertain histogenesis, for example, whether or not these metastases come from an unknown primary tumor.
Also used in neurodegenerative diseases. These images on the right here of the TDP43, which is a marker in the familial frontal temporal lobe degeneration, and on the left, you can see this in a patient with this disease, and on the right, you can see this in an animal model of the disease in mice. IHC can also be used in identifying brain trauma, so staining for amyloid precursor protein following brain injury can help detect axonal injury as little as two to three hours following the head trauma. Other IHC actually applications. For example, you can use IHC in basic research. It is commonly used in basic research. For example, if you want to phenotype any genetic mutations, you can look at how their knockout of said mutation can affect any downstream targets, either within that tissue or in any affected tissues.
And also with viral targeting confirmation, especially in things such as neuroscience, more and more viral targeting is being used to manipulate local gene expressions. These viruses are often tagged with GFP or similar tags. We can amplify these tags and then visualize whether or not the viral targeting has been in the correct location. This was something that I used a lot in my own work. IHC is also really useful in drug discovery, as it can be used to look up or downregulation of disease markers in response to certain treatments. Here we can see Iba1, which is a marker for microglia. Microglia are highly important in the CNS, in the brain, as they act as the macrophages of the brain. And when they become active, that is an indication of infection or stress on the brain. And here you can see that following ketamine treatment, these arrows are showing you a lot more of these microglia have become activated.
2. Considerations before you start
So before we need to start our protocol, we have some things to consider first. So one of those is fixation and the type of fixes we will use. Tissues and cells need to be fixed before staining, and this is to prevent cells and structures falling apart. Tissue requires either a long fixation process through immersion or through perfusion. Often it is good to try and perfuse with PBS prior to perfusing with formaldehyde, as this will remove any blood and blood can contaminate various antigens and affect our staining. Formaldehydes work by cross-linking proteins. So formaldehyde such as paraformaldehyde or formalin, they create covalent cross-links, essentially growing these proteins together to form an insoluble meshwork.
Formaldehyde is good because it conserves the cellular morphology. However, this cross-linking of proteins can mask epitopes and can also cause autofluorescence if using a fluorescent detection system. Acetone and other organic solvents act asfixatives as strong dehydrating agents, as these dehydrate the cells and cause proteins to precipitate and denature it in situ. Acetone is one of these and is good as it can be used as an alternative to formaldehyde as it is often gentle on epitopes. However, it can cause a loss of lipid components due to the nature of the fixation.
Some other considerations that we need to take into account before starting is how we prepare our tissues. So tissues fixed by formaldehyde or formalin are often typically embedded in paraffin before sectioning, and these are typically referred to as FFPE sections, which means formalin-fixed and paraffin-embedded. So when we have our FFPE sections, once they are firmly embedded within the paraffin, we then go on to cut these on the microtome. However, some fixation steps might not be appropriate for certain tissues, so instead, we can cut these straight from frozen. In order to do this, we will embed our tissues in a cryogenic protection, such as OCT, which stands for optimal cutting temperature compound. So then we can cut these sections on a cryostat and then mount them onto slides. So the differences between cryostat, so frozen sections and paraffin FFPE sections is that frozen sections can often get, because they don't have their epitope masked because of fixation, but you do get some disadvantages such as poor tissue morphology and decreased resolution at high magnifications.
And then other things take into account when we're preparing our samples is the thickness at which we cut our sections. So we want to ensure that our sections are cut at around 5 to 10 micrometers thickness. If this is too thick, then you will get strong signals and high background due to the fact that there's just simply more target antigen present in your tissue creating more signal. If they are too thin, then they can be easy to damage and often difficult to embed as well. One thing to note as well, when sectioning our samples is that we want to have well-coated glass slides. You can get very good commercially available, but you can also make these yourselves if necessary, through things such as gelatin coating. Understandably, we really want our tissue to adhere well to the sides, otherwise, they can slip off and cause issues further down the line.
Something else to take into account is how, if we need to do any antigen retrieval, antigen retrieval is typically carried out before staining, as this is required in most formalin-fixed tissues, as this can potentially unmask any epitopes from our fixation process. So the options we have here are heat epitope retrieval, and to do this, we will heat our slides up either using citrate buffer, which is pH6, or Tris-EDTA, which we can also often use for phosphate proteins. And another option which is less common is proteolytic-induced epitope retrieval, and to do this you will proteinase K or trypsin. So here you can see a paraffin-embedded tonsillitis tissue, following different types of antigen retrieval. These are both using heat antigen retrieval, so on the top here, you can see no retrieval, and then with Tris-EDTA, which is pH9, you can see a slight specific staining of our antigen. And then at the bottom, you can see that sodium citrate is the best choice for our antigen retrieval here.
So what are the differences between the two? So heat-induced epitope antigen retrieval is where a slide is heated up in a microwave or a pressure cooker, often with a citrate buffer at around pH6, or with Tris-EDTA, which has a higher pH, and as I mentioned before, is good for antibodies against phosphate hydrazine residues. PIER, so proteolytic induced epitope retrieval is good if you have an epitope which is difficult to recover, and this is at neutral pH, using proteinase K or trypsin, and is incubated at around 37 degrees. Something to be aware of is that unequal heating could lead to unbalanced epitope retrieval and therefore affect any of your analysis further down the line. And if you're using PIER, then too strong enzymatic retrieval could also damage your tissue morphology.
3. General protocol
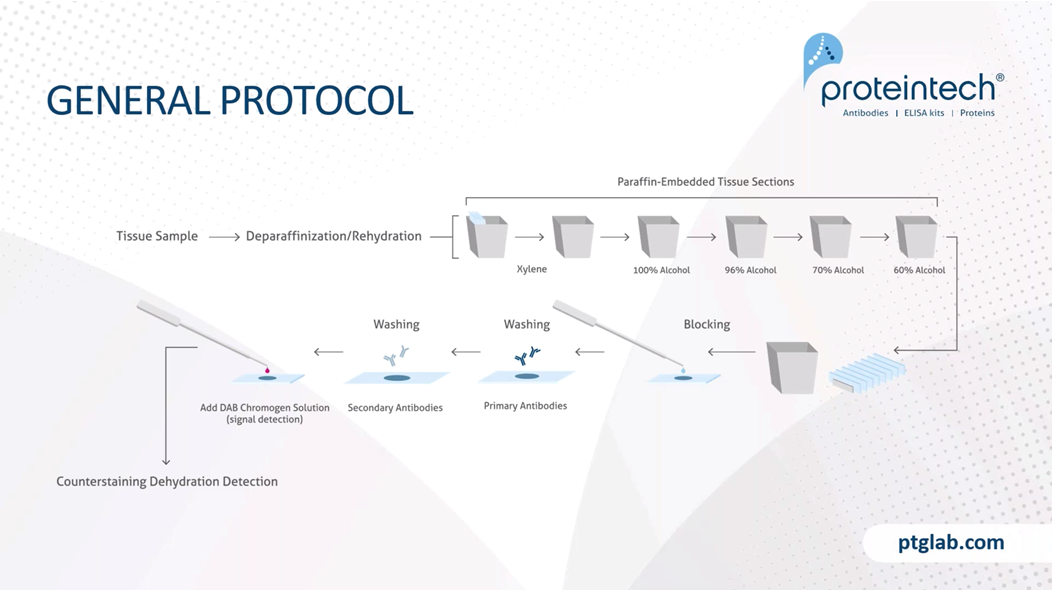
So this is a general protocol, and I just want to note that this is a very brief overview and that this protocol will need to be tweaked based on your experiment needs, for example, your tissue type, your antigen abundance, the antibody you're using. And we have on our website product-specific protocols, which we highly recommend you following based on the antibody, as this will provide you with the best results that we have determined already in our labs. So to start with, we need to remove the paraffin, because paraffin is a hydrophobic compound, and this will obviously stop any staining if it's remained on the tissue. So to do that, we use xylene. You can also now get xylene-free solutions that help to do this as well, because xylene isn't the nicest compound. And following xylene, you then have to rehydrate your slides in decreasing ethanol solutions.
Following that, we have a blocking step, and the blocking step is important to reduce any nonspecific binding. And then we need to wash the blocking solution off, so washing steps are very important here before incubating with our primary antibodies. Primary antibody concentrations and incubations should be based on either what the manufacturer recommends or on your protocol that you know works. And then following that, we need to wash off our primaries to ensure that we're removing any unbound primary antibody from the system before incubating with our secondary antibodies. In this example here, we would incubate with a HRP tag secondary antibody before then visualizing this with DAB. For example, when using a chromogen and using DAB, we want to make sure that we are carefully timing how long it takes for a reaction to occur so that we don't overstain or understain using this DAB reaction before stopping it. And then following that, you can either use a counterstain such as Hoescht, which is a nuclear stain, and then we need to mount and seal our samples.
We need to block our tissue, and this is a really important step. The blocking step, as this prevents any nonspecific binding of antibody to tissue or FC receptors. Protein blocking typically uses normal serum and serum is a common blocking reagent, as it contains antibodies that bind to the nonspecific sites. It is important that the blocking serum is not the same species that our primary antibody was raised in, otherwise, we will lose our specificity of the secondary antibody. BSA is also another common blocking reagent, and this is often used in conjunction with Triton-X, which is a surfactant and will help the wetting, the coating of the BSA to our tissue. If using chromogens such as HRP or AP, it's really important that we block any endogenous enzymes that might be present in the tissue before we add our secondary and primary antibodies. To do this for HRP, you typically block with H2O2 and for alkaline phosphatase, you block with acetic acid or similar buffers. And as mentioned, this is really important as we went to block any endogenous enzyme activities and therefore prevent any nonspecific activity which could give us some false-positive results.
4. Choosing the best antibodies
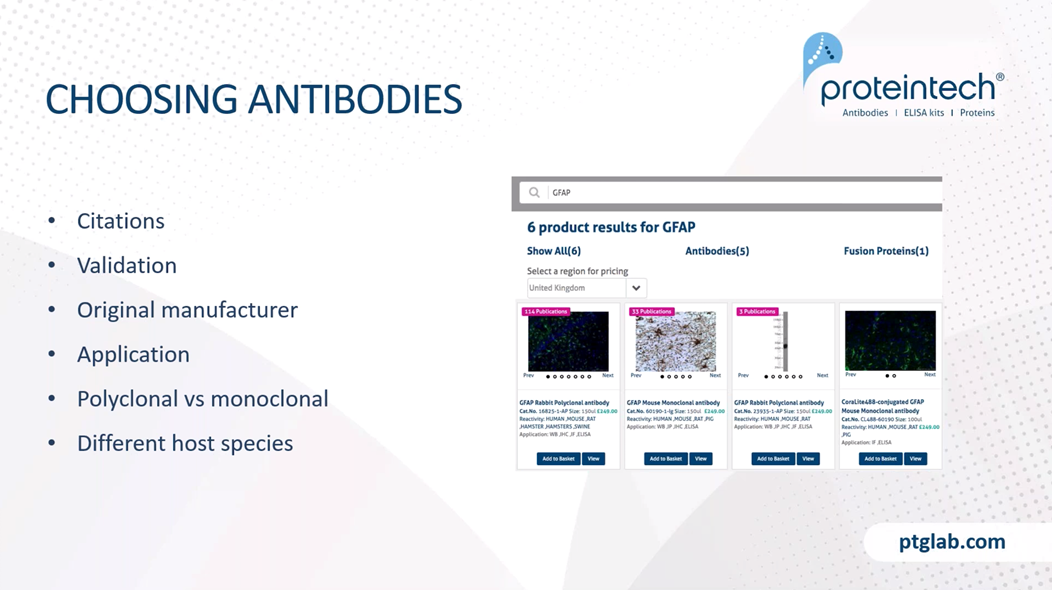
When choosing our antibodies, there are lots out there, so it's really important that we do our own research before choosing any antibodies for, for example, new experiments or new tissues. So things to look out for when choosing our antibodies are the number of citations this antibody might have, specifically looking at whether or not this antibody has been used in the same tissue, the same experiment type that you have, so the same sort of fixation and slicing and even species, for example. So these can all be found in our website, you can see where the antibody has been cited and what application and species it was used in. It's also highly important that we look at how the antibody was validated and whether or not that manufacturer has the original validation data, so that if you're having any issues, you can speak to the manufacturer and they can provide you with this information.
You also want to ensure that there is validation data on the application that you require, so in this case immunohistochemistry, and in general, we want to have a look at whether or not you need a polyclonal or a monoclonal antibody. And in general, for IHC, polyclonal antibodies are most traditionally used. Just to remind everyone, a polyclonal antibody is one that has been raised against the whole protein or antigen, and it will therefore have higher affinity as there'll be lots of antibodies that bind to multiple different epitopes. So these are good for the majority of stainings.
However, if you have an antigen which is highly abundant, then you might want to use a monoclonal antibody, and monoclonal antibodies have raised against just one epitope, and therefore they have much higher specificity and are less likely to cross-react. And finally, one more thing to look at when choosing your primary antibodies is whether or not you need to have it raised in a different host species to those that you already have. Say, for example, you want to do a multiplex staining experiment, the easiest way to do this is to either have your primary antibodies raised in different hosts, say for example, rabbit or mouse.
So when we buy a new primary antibody or we have testing it in a new situation, for example, a new tissue, a new species, you want to optimize this primary antibody in order to get the best results. So the way that we recommend you do this is to perform titration experiments, and this will help determine the best concentration and incubation time for your tissues and targets. If you have a high-affinity antibody and highly available target, then you will want to use a low concentration. This is the reverse if you have low availability targets, you might want to try to increasing the concentration and Incubation time as well. If you have a high-affinity antibody or a highly abundant target, then you will only need a short incubation time, often at room temperature. If you have a target which is poor accessibility, this will need an increased incubation time, and this will help it to penetrate the tissue.
So when we're choosing our secondary antibodies for immunohistochemistry, we really want to ensure that we will get the best signal to noise ratio, and this means reduced background staining. Another thing that we need to take into context is potentially the subclass specificity. This is applicable if you're using monoclonal antibodies. So different monoclonal antibodies and primaries might have different subclasses of isotypes. You might have an IgM or an IgG2A subtype, and you can also get secondaries that would specifically target these different subtypes. So this might be good if you have two different primary antibodies raised in mouse, and if they have different isotype specificities and you'll be able to use different secondaries in order to perform a multiplex staining. However, if you are unsure and you just want to target your monoclonal antibody, in order to ensure that it will recognize that subclass ensure that your secondary antibody states that it is IgG heavy and light chain, and this will target all primary antibodies raised in that host.
Another thing that you want to be aware of is any cross absorption. So this means that we want to reduce any possibility of cross-reactions with other species. Say, for example, we went to try and avoid any mouse on mouse combination, so that would be, for example, using a primary antibody raised in mouse in mouse tissues. However, if this is your only option, there are some kits out there, mouse on mouse staining kits that will reduce any background noise you might see. Something else that you can be aware of are secondary antibodies that are F(ab')2 fragments. These are missing the FC chain here, and they are smaller and are therefore more easily able to penetrate tissue. You are also reducing any background signal through binding to any endogenous FC receptors, and that's good for tissues which have high FC receptor concentration, such as spleen and thymus.
So now we finished incubating our primary antibodies, you want to think about how we're going to visualize this? You can either do this using chromogenic or fluorescent staining. Most chromogenic detection systems use HRP, that's horseradish peroxidase, which will interact with DAB and forms a black and brown insoluble product, or an alkaline phosphatase, which interacts with AEC, which forms a red product. And often these come with signal enhancers as well, such as the AEC complex.. As well as chromogenic stains, you have fluorescent staining. So fluorescent staining is where we have a fluorochrome attached to our primary antibody as direct immuno-fluorescence or attached to its secondary antibody as indirect immunofluorescence. And fluorescent staining is excellent for multicolor staining panels.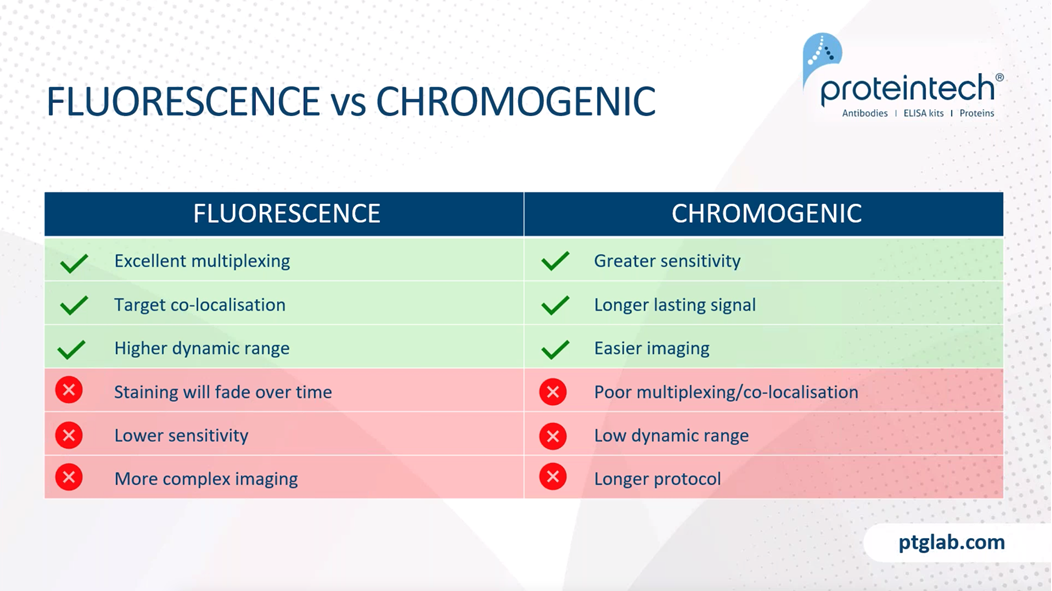
Now I am just going to quickly go over the difference between fluorescents and chromogenic stains. So fluorescent staining is excellent for multiplexing, as it allows you to image multiple targets just within the same sample. You also get better co-localization, and you can see protein-protein interactions with this fluorescent stain. You'll say have higher dynamic range with fluorescent staining, as this allows you to see highly abundant antigens and low abundant antigens at the same time. However, some of the negatives of fluorescence staining is that the staining will fade over time and you also have lower sensitivity. It also requires more complex imaging protocols because you require more complex microscopes, such as a widefield fluorescence work on focal microscope in order to see these.
Chromogenic stains are more sensitive due to higher signal amplification. As long as the slides are stored properly, you will get long-lasting signal, essentially forever. You also have easier imaging because you just need a bright field microscope for this. However, as mentioned, it is slightly worse for multiplexing and co-localization studies. You have a lower dynamic range and also the protocol is ever so slightly longer. So these are just different examples of fluorescent and chromogenic stains. On the left here we have an example of chromogenic staining with DAB being used to visualize the E-cadherin antibody in this breast cancer tissue slide. And on the right here, this is a fluorescent stain. And here you can see two stains wherein red we have our MAP2 antibody, which is a common neural marker, and in green, we have our GFAP antibody, which is a common glial marker. And you can nicely see the distribution here.
At Proteintech we have recently launched our new range of CoraLite fluorescent-dye conjugated antibodies, and these are where our popular monoclonal and polyclonal antibodies are now available, which are directly conjugated with fluorescent dyes. So this negates the need for a secondary antibody with a fluorophore, and therefore they act as perfect tools for your IF studies which require any multiplex co-labeling and reduce any secondary antibodies and therefore can speed up your experiments and save you valuable time.
5. Controls
Moving on, we now need to consider what controls we will need for our experiments. And it's highly important that we run these controls at the same time as our experimental slides in order to negate any differences that you have with day to day variability between experiments. So our antigen controls need to include a positive control, and this is where we stain a tissue which we know expresses the target antigen. So this will confirm that our protocol is working and will also validate any negative results, rather than if you're using new tissue and you can't see any antigen staining, you might think that the antibody isn't working or your protocol isn't working. But in fact, if you use the positive control you'll be able to validate this.
We also need a negative control, so this is where we have tissue that is known not to express target antigen, and this will reveal any potential false positives or nonspecific signal. Here on the right, you can see our HADHA antibody, which is used in cells which are expressing HADHA, and then on the bottom, you can see following siRNA of HADHA, you can no longer see this specific staining. One further antigen control is just staining the endogenous tissue, so this is where the tissue is prepared in the exact same way as our experiment, however, we do not intubate with any primary or secondary antibodies, and especially in immunofluorescence, this will reveal any potential autofluorescence that occurs due to cross-link fixatives.
We also need to look at reagent controls, and this is where we have no primary antibody and this ensures that our signal detected is specific for the target. We also need to test all our fluorophores or chromogens in isolation. And again, this ensures any background noise we're seeing is not specific to our target. It's also recommended to use an isotype control, and this is where you would incubate with a non-immunoglobulin of the same isotype and the same concentration as our primary antibody. And again, this is another way to ensure that our observed signal is specific.
6. Troubleshooting
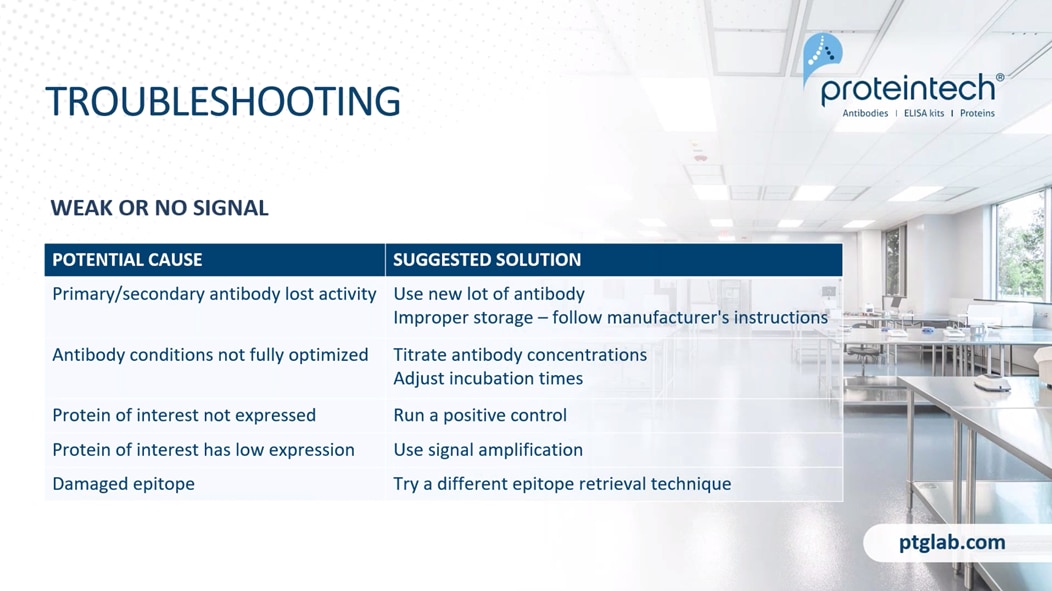
Lastly, just going to go over some quick troubleshooting queries. What do you do and what is the cause potentially if you have weak or no signal? So one cause is that your primary or secondary antibody has lost activity, and our suggested solution here is just to use either a new lot of antibody and also to check the storage of your antibody and always ensure that you're following your manufacturer's instructions rather than just going with whatever you have done before. So for example, at Proteintech, we store our antibodies with glycerol, therefore you do not need to aliquot them. Another cause is that your antibody conditions might not be fully optimized. One way that we can do this is to titrate our antibody concentrations and adjust incubation times accordingly until we potentially see some actual decent signal.
One issue is that you might not have your protein of interest expressed. So as mentioned, always run a positive control. If your protein of interest has low expression, then try signal amplification steps. And if you have a damaged epitope, this could be due to poor epitope retrieval or poor fixation, so try a different epitope retrieval technique or a different fixative. Another common troubleshoot inquiry is if you have high background or nonspecific staining. So this could be if your primary or secondary antibody concentration is too high, so just try a titration experiment. If you have any nonspecific antibody binding, you might want to try prolonging your blocking step, increasing your concentration of your blocking solution. It could also be due to poor sample washing. As mentioned, it's really important that you have thorough washing steps following blocking antibody application, primary and secondary, as this removes any unbound antibody in the system that could be causing further signal, especially the high background signal. You also can get high background due to damage the epitopes as mentioned before. try different epitope retrieval technique or fixative.
And lastly, if you're seeing inappropriate morphology with your results, this could be due to harsh antigen retrieval conditions, so you will want to optimize buffers and your temperature and pH. You might have unclear tissue structures. So this could be if you're using the wrong section thickness for your tissue. Your protein of interest might not be expressed, so try a positive control to test your experiment conditions. And if your tissue is not sticking to the slides, then this could be causing it to bunch up or fold over, which again would quite obviously cause inappropriate morphology. So for this, we recommend using coated slides and ensuring that you have optimal fixation and epitope retrieval that isn't affecting your tissue adherence.
So it comes to the end of the talk now. Thank you so much for listening and watching. If you have any questions, please write them in the questions section below, and I will wait a couple of minutes to see if you have any. Otherwise, please feel free to email myself, rebecca@ptglab.com or Will, our scientific officer over in the US who is also a great resource for help. So please feel free to email us both and otherwise have a lovely day wherever you are, and I hope you enjoyed our talks. These will be available on the website, following recording, and we also have on our website further resources, so more tips and tricks and FAQs for our various applications. We always recommend that you use our product-specific protocols as well for best results. All right, thanks everyone, and have a good day.
Able™