
Western Blot Protocol
Our standard Western blot protocol, including RIPA and SDS sample buffer recipes.
Jump to:
- Western Blot Protocol
- How To Optimize Your Western Blot
- SDS-PAGE Gel Recipes
- How To Optimize Your Results With Low MW Proteins
- Tricine Gel Recipe For Low Molecular Weight Proteins
- Choosing The Right Lysis Buffer
- Choosing The Right Western Blot Detection Method
- Western Blot Troubleshooting: Why Does The Observed Protein Molecular Weight (MW) Differ From The Calculated One?
- Western Blot Troubleshooting: High Background
- Western Blot Troubleshooting: Weak/No Signal & Other
- Western Blot ppt
- Western Blot Video Protocol
Western blot is an analytical technique used to detect and determine the abundance of specific proteins of interest within a sample. This sample is usually called a lysate, which is the product of lysing cells or tissues to release all the protein contents within that cell type or tissue. This allows the researcher to determine a number of things about their sample including what proteins are present and at what level are they expressed, as well as possible post-translational modifications such as phosphorylation.
Proteintech control antibodies are $189 each for a 150ul size vial
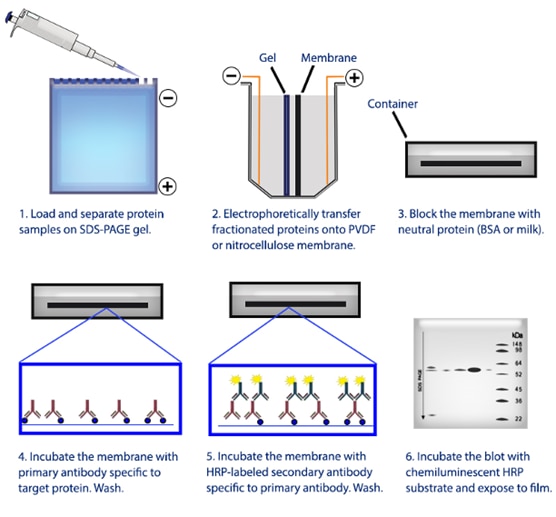
View all Loading Control AntibodiesOnce the lysate has been prepared and protein concentration determined the main western blot workflow can begin. The overall principle of western blot workflow includes 4 main steps: separation by size, transfer to membrane, immunoblotting with antibodies and visualization of your probed proteins.
Contents:
Summarized Western Blot Workflow
SDS PAGE
SDS-PAGE is the process by which proteins are denatured and linearized, before being separated according to their molecular weight.
This is achieved by treating the lysate prepared previously with loading buffer that contains SDS (Sodium Dodecyl Sulfate). As a strong detergent, SDS not only linearizes but also adds a negative charge to the elongated proteins. When exposed to an electric current, these negatively charged linear proteins will be attracted to the positive electrode.
In PAGE (Polyacrylamide gel electrophoresis) an electric current is applied to an acrylamide matrix. This allows the linearized negatively charged proteins to migrate towards the positive electrode at different speeds through the matrix, depending on their size. Smaller proteins migrate faster, and larger proteins migrate slower. The end result is an acrylamide gel containing all the proteins in your lysate separated due to size and charge.
-
Construct an SDS-PAGE gel according to the molecular weight (MW) of your target protein(s). (For recipes see the "SDS-PAGE gel recipes" section)
-
Prepare samples in microfuge tubes. Add 4X SDS sample buffer so the total protein amount is 30 - 50ug per sample (according to the protein amount measured by Bradford or BCA protein assay).
-
Flick microfuge tubes to mix samples, spin them shortly, and then heat to 95 - 100℃ for 5 minutes.
-
Set up electrophoresis apparatus and immerse in 1X running buffer. Remove gel combs and cleanse wells of any residual stacking gel by pipetting running buffer up and down in each well using gel-loading tip (Figure 1).
-
Load samples and appropriate protein markers onto the gel using a tip.
-
Place the lid on the gel tank. Turn on electrophoresis power pack and set to a low voltage (as the sample runs through the stacking gel), increasing to a higher voltage (e.g., 120V) when the dye front reaches the separating layer. Stop the gel running when the dye front migrates to the desired position.
| Tip: Tris-tricine gels separate low MW proteins. (<20kDa) better than Tris-glycine gels. |
 |
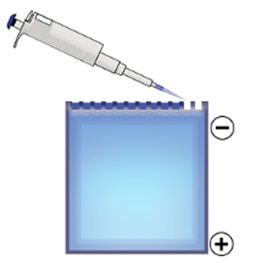 |
Figure 1. After removing gel combs rinse each well thoroughly with running buffer to ensure no remaining bits of acrylamide are blocking them. Use gel-loading pipette tips to facilitate easy and even loading of your protein samples.
Membrane Transfer
The transfer step simply transfers these proteins from the acrylamide gel matrix onto a membrane. This is achieved by an electric current again, causing the negatively charged proteins to move out of the acrylamide matrix and onto a specified western blot membrane. This membrane can then be probed for proteins of interest using primary antibodies.
There are different types of membranes to choose from, the most popular being PVDF or nitrocellulose. We strongly recommend PVDF membranes (or PSQ membranes with 0.22um micropores for targets less than <30 kDa).
Although all transfer techniques use the same basic principle of transferring proteins onto a membrane using an electric current, there are several different methods of western blot transfer:
1. Wet Transfer
In wet transfer a similar gel tank is used to SDS-PAGE in that the gel and membrane stand vertically, but this time with the current moving across instead of down the tank. The tank is filled with transfer buffer, which is similar to running buffer as it allows for the facilitation of the electrical current, but also contains methanol which allows for the adsorption of proteins onto the membrane. The gel and membrane are placed in a traditional transfer sandwich which comprises of filter paper and sponge pads.
|
Pros |
Cons |
|
· Efficient and adaptable · Equipment popular and well-priced · Good for high molecular weight proteins and low abundant proteins |
· Longer Transfer Time (1h/2h or even overnight) · More set up · Requires large amounts of buffer and methanol |
2. Semi-Dry Transfer
Semi-dry transfer uses the same principles as wet-transfer but instead the membrane lays horizontally in a cassette instead of vertically in a tank. Transfer buffer is used however the components of the sandwich are soaked in the transfer the buffer instead of being surrounded by it. The specialist transfer machine will then apply a current through the cassette to initiate transfer.
|
Pros |
Cons |
|
· Quick transfer taking anywhere between 5 and 30 minutes · Less clean up · Often come with adaptable settings |
· Specific equipment required which can be expensive · Not always as efficient with high molecular weight or low abundant proteins · Often need to purchase company buffers |
3. Dry Transfer
Dry transfer systems still use an electrical current to transfer the proteins from gel to membrane but instead use no buffers at all. Instead, specialized transfer stacks are used which are able to facilitate the electric current. This allows for a rapid and buffer free transfer.
|
Pros |
Cons |
|
· Fastest transfer technique · No buffers needed and therefore less prep and clean up · Very efficient transfer |
· Specific equipment required which can be expensive · Requires pre-assembled transfer stacks which you need for each transfer · Higher cost overall |
Transfer protocols can vary depending on the equipment; therefore, you should always aim to follow the manufacturers protocol. Below is protocol which can be adapted to most wet and semi-dry transfer systems:
- Soak membranes in methanol for 30 seconds before moving to transfer buffer.
Note: this is not required for nitrocellulose membranes - Soak the filter papers and sponges in transfer buffer.
- Sequentially assemble the transfer constituents according to the illustration shown on the next page (Figure 2), and ensure no bubbles lie between any of the layers. Apply semi-dry or wet transfer systems according to the instructions of the blotting apparatus manufacturer.
Immunoblotting
Immunoblotting is the process by which antibodies are used to mark proteins of interest on your protein coated membrane. Like many antibody-utilizing techniques, the first step is to block your membrane to reduce any non-specific binding of the antibodies to your membrane.
The next step is to add primary antibodies that will bind to your protein of interest, before adding the secondary antibody. The secondary antibody binds to the species-specific region on the primary antibody, and is attached to reporter, such as a fluorescent probe or reporter enzyme. This allows you to quantify the levels or your protein of interest within your sample.
The immunoblotting section of the western blot protocol is the most adaptable. Buffer types, detergent concentrations, incubation times and antibody types are all things that can be changed to optimize the conditions for your immunoblotting. For more information, see the troubleshooting section.
-
Following transfer, wash the membrane twice with distilled water or 1xTBST.
Tip: Do not let the membrane dry at any stage of the blotting process. -
Gently mark the bands of the MW ladder on the membrane using a pencil.
-
If desired, stain the membrane with commercial Ponceau red solution for 30 seconds to visualize protein bands, then wash away Ponceau red solution with generous amounts of 1x TBST.
Tip: A Ponceau red stain will allow you to visualize all your protein bands on the membrane, therefore should be done if you are concerned about the efficiency of your transfer -
Block with 1x TBST containing (2-5%) non-fat dry milk (or 1-5% BSA for the detection of phospho-epitopes) with constant rocking for 1 hour or overnight at 4°C.
-
Dilute primary antibody in blocking solution with a starting dilution ratio of 1:1000. (Optimal dilutions should be determined experimentally with a dilution series.) Incubate the membrane with primary antibody for 1 hour (or overnight at 4°C) on a benchtop rocker.
-
Wash membrane three times with 1x TBST for 10 minutes each.
-
Incubate the membrane with a suitable secondary antibody (recognizing the host species of the primary antibody), diluted according to the instructions. Incubate for 1 hour with constant rocking.
Tip: if using fluorescent secondary antibodies at this point the membrane should be kept in the dark - Wash membrane three times with 1x TBST for 10 minutes each.
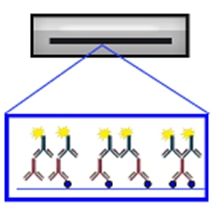
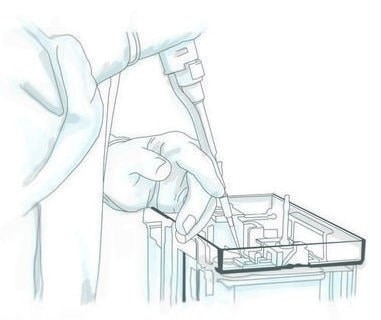
Figure 3. Using a small container, the membrane is blocked, washed and probed for proteins of interest using primary antibodies. Secondary antibodies are conjugated to a reporter to allow for signal detection.
Signal Detection
Signal detection is the next step within the western blot workflow. This step allows for the quantification of your protein of interest within your sample. The signal detection method depends on your selection of secondary antibody reporter. For example, if using an enzymatic reporter, at this point you would add your substrate before imaging your membrane. Whereas using secondary antibodies conjugated to a specific fluorophore, the membrane can be scanned straight away using an imager capable of excitation and measuring emission of specific fluorescent wavelengths. Below is a simple protocol for imaging ECL membranes.
-
Prepare ECL substrate according to the manufacturer’s instructions.
-
Incubate the membrane completely with substrate for 1–5 minutes (adjust time for more sensitive ECL substrates, e.g., SuperSignal West Femto Chemiluminescent Substrate [Pierce]).
-
Expose the membrane to autoradiography film in a darkroom or read using a chemiluminescence imaging system.
-
Line up the developed film in the correct orientation to the blot and mark the bands of the MW ladder directly onto the film. It is also advisable to add notes such as lane content, film exposure time, and ECL properties.
| Tip: Use multiple exposure lengths to determine the optimal exposure time. Use fluorescent markers and clip the top right corner of your film as a guide for blot film orientation. |
Buffers Required