
Mouse-on-mouse for Immunohistochemistry: tips and tricks
Learn how to mitigate issues with high background staining and perform mouse-on-mouse staining with confidence.
Mouse models are commonly used in life science research to help understand basic physiology to facilitating drug development. Immunohistochemistry (IHC) is a popular technique used in mouse tissues to visualize the involvement of certain proteins within that tissue and how they respond to experimental conditions. One of the drawbacks of this, is that many antibodies (especially monoclonal antibodies) are produced in mouse. Thereby when you use an “anti-mouse” secondary antibody in mouse tissue, this can bind to endogenous mouse IgG and FC receptors in the tissue, causing high background and/or non-specific staining. As such, many researchers are understandably wary in using mouse primary antibodies in mouse tissue and tend to avoid them altogether. However, this does not need to be the case and hopefully with our mouse-on-mouse (MOM) staining tips, you can continue to use your favourite antibodies in mouse tissue.
Tip #1: Try it and see (with controls)!
It is hard to predict when MOM staining will show high background or non-specific signal. As such, your best bet here is to first try it for yourself with the appropriate controls to reveal the level of background staining and assess the reliability of your results. Simply run your IHC experiment as planned, but make sure to include a secondary only control and an isotype control* if possible. These controls allow you to be sure that the observed signal is originating from specific primary-specific secondary antibody binding, rather than from off-target secondary antibody binding. If your controls reveal no unwanted background, then you are good to go! Just be sure to include these controls in all your experiments in case it later becomes an issue. At Proteintech, our no-fuss antibody guarantee means that you can try one of our mouse monoclonal antibodies with the peace of mind that if you see high background in mouse tissue and are unhappy, we will refund you immediately (hassle free and no questions asked!).
*If using an isotype control, be sure that it is of the same subclass as your primary (mice have four IgG subclasses), used and the same concentration and preferably from the same manufacturer as the primary.
Tip #2: Blocking endogenous mouse IgG
Endogenous IgG is often caused by residual blood in the tissue. Therefore, if you are seeing high background with MOM staining, your first step should be to perfuse the animal with ice-cold PBS prior to perfusion or immersion fixation with 4% paraformaldehyde.
Perfusion case-study: A Proteintech customer contacted us to say that a mouse monoclonal antibody for a phosphorylated protein produced very high background which was still present with the secondary only control. We proposed to the customer that this high background could be caused by the presence of endogenous IgG in their sample and recommended to perfuse their sample. Following perfusion, the customer found the background to be dramatically reduced revealing the expected staining pattern from the antibody.
If perfusion is not possible with experiments, or you are still seeing high background, your next step should be to try blocking the endogenous mouse IgG. Before staining with your primary and secondary antibodies, incubate with anti-mouse F(ab) fragment antibodies, at a suggested concentration of 0.1 mg/ml. This should be done after your traditional blocking step of incubating with serum from your secondary antibody host e.g. normal goat serum, or BSA + 0.5% Triton-X. Following this extra blocking step, you can then proceed with your antibody staining as normal.
Side note: FC receptors in FFPE (formalin fixed paraffin embedded) samples are normally deactivated by the fixation, dehydration and paraffin removal steps of an IHC protocol, thus should not be a problem in these samples. However if you believe they could be cause of high background, then tips 2-4 in this article should work to prevent this.
Tip #3: Go Direct!
As the majority of issues arising from MOM staining come from the secondary antibody, these can be eliminated by removing the secondary antibody from the equation by using directly conjugated mouse primary antibodies.
At Proteintech, our highly popular FlexAble Antibody Labelling Kits mean that you can directly conjugate your favorite mouse antibody for use in mouse tissue with no off-target binding from the secondary antibody! It also allows you to multiplex antibodies from the same species. FlexAble kits are available with 5 different fluorophores and can label as little as 0.5 μg of antibody with no buffer exchange in just 10 minutes. Find out more here.

Many antibody manufacturers now make antibodies with detection enzymes or fluorophores directly conjugated to primary antibodies, which have multiple benefits from streamlining your IHC protocol, reducing background and improving resolution, to removing any MOM secondary antibody issues. At Proteintech, many of our popular mouse monoclonals are directly conjugated to CoraLite dyes with extensive validation in IHC-immunofluorescence, available in up to three colours Coralite488, Coralite594 and Coralite647 (Fig. 2). You can view our range of CoraLite dye directly conjugated antibodies here.
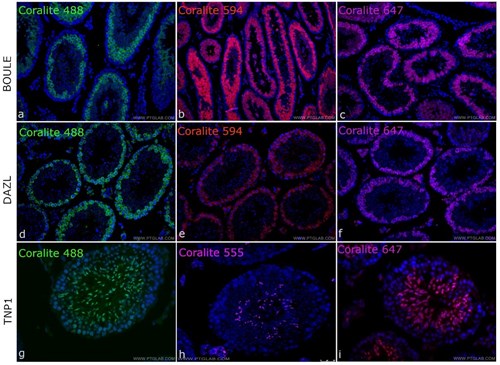
Figure 1. Directly-conjugated CoraLite mouse primary antibodies against the testes proteins BOULE (A,B,C), DAZL (D,E,F) and TNP1 (G,H,I) conjugated to CoraLite 488 (A,D,G), CoraLite 594 (B,E,H) and CoraLite 647 (C,F,I). Experiments were done on Mouse testis tissues.
Tip #4: Create an antibody complex
Alternatively, MOM staining issues can be rectified by creating a primary-secondary antibody complex prior to incubation with the tissue. This has been successfully shown by Goodpaster and Randolph-Habecker (2014), where they recommend a 20 minute incubation of the mouse primary and f(ab) anti-mouse secondary in a 1:2 ratio (1µg of primary antibody per 2µg of secondary), plus a 10:1 ratio of normal mouse serum to the secondary antibody for a further incubation of 10 minutes. This complex is added to the slide, followed by streptavidin-HRP for detection. This method binds the secondary antibodies to the primary antibodies before adding to the tissue, and then the remaining secondaries will be bound by the mouse serum, meaning that there is no off-target binding by the secondary antibody, which can clearly be seen in Figure 1. For more details and further methods for biotin free labelling you can view the article here.
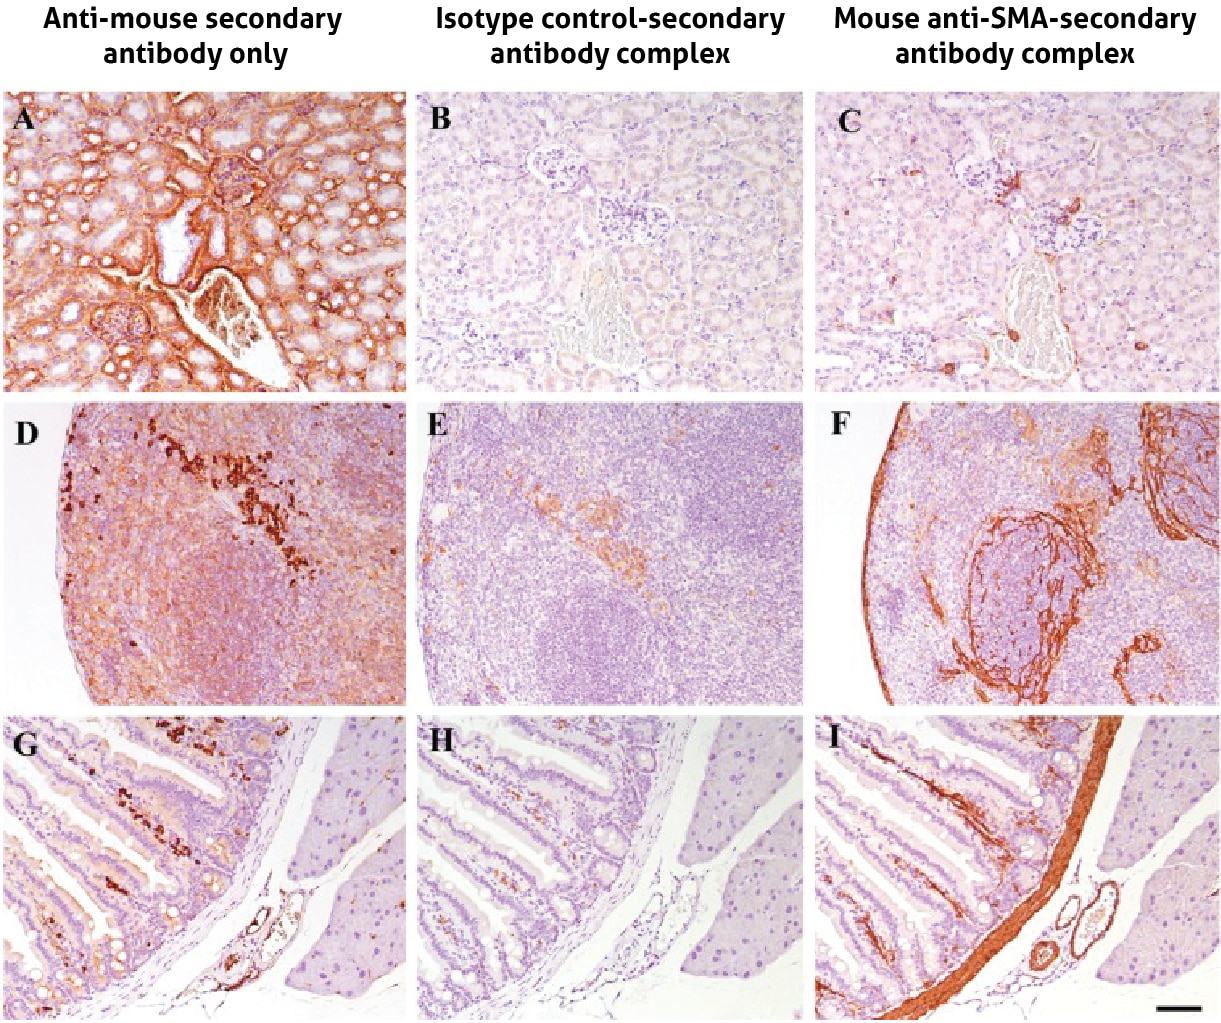
Figure 2. Mouse-on-mouse staining using the pre-mixed primary antibody and f(ab) secondary antibody method on mouse samples of kidney (A,B,C), spleen (D,E,F) and intestine (G,H,I) tissue. With the anti-mouse secondary only (A,D,G), a lot of non-specific staining is observed that could be mistaken for biological signal. When complexing the primary antibody first with the f(ab) secondary, the isotype control (B,E,H) shows no staining as expected and specific staining with the mouse anti-SMA antibody (C,F,I). SMA=smooth muscle actin. Figure taken from Goodpaster and Randolph-Habecker (2014), open source.
Conclusion
IHC experiments can be tricky at the best of times, and mouse-on-mouse staining can be particularly daunting. We have now shown you that there are many ways to mitigate these issues without using expensive commercial kits, but still creating publication worthy results. Good luck!
Written by Dr. Rebecca Northeast, Proteintech Product Manager

Related Content
CoraLite conjugated antibodies
Direct vs Indirect Immunofluorescence
Advantages of CoraLite direct staining for IF
Save time on your immunofluorescence experiments
Support
Newsletter Signup
Stay up-to-date with our latest news and events. New to Proteintech? Get 10% off your first order when you sign up.