
A beginners guide to Immunohistochemistry
12 steps to get you started with immunohistochemistry
Written by guest blogger Sarah Etheridge. Revised by Swati Roy (Product Manager, Proteintech)
Immunohistochemistry, or IHC, allows you to visualize proteins in intact tissue retaining its microstructure, or as I like to say: ‘real life’. One of the advantages of this ‘real life’ visualization is that it allows for comparison between healthy and diseased tissues, thus the application is invaluable to both scientist and pathologist alike. The IHC protocol is straightforward, but contains many steps that may require initial optimization to ensure specific antibody binding and optimal visualization of the target protein. Here, I outline some tips for each of these steps and highlight which may need a little tweaking.
1. Tissue preparation
Tissue samples can be frozen or fixed. Freezing the sections generally maintains the conformation of the target antigen allowing superior antibody binding, but small ice crystals may form in the tissue [1, 2] and these sections may not be a good choice for long-term storage. Fixed and embedded tissue is a better alternative if you wish to hang on to your slides a little longer. The most common method of tissue fixation and embedding is formaldehyde fixation with paraffin embedding (FFPE). It is possible to store FFPE embedded biopsies indefinitely at room temperature – making them an important resource for historical studies in medicine. Fixing tissue sections, before staining, with ice cold 50:50 methanol-acetone (MeAc) or 4% paraformaldehyde (PFA) may enhance antibody binding. MeAc, for example, dissolves cytoplasmic proteins allowing better visualization of membrane bound proteins.
2. Antigen retrieval
Formaldehyde fixing causes cross-linking of proteins within the tissue, maintaining tissue morphology but denaturing the epitopes recognized by the antibody [3]. Therefore, antigen retrieval is usually carried out before staining FFPE sections to unmask hidden or denatured target epitopes. This can be heat-induced or enzymatic [1, 4] with factors such as temperature, pH and time affecting antigen retrieval. It is a good idea to test a ‘battery’ or panel of antigen retrieval methods for each new antibody and tissue combination to determine optimal staining and rule out any non-specific background staining [5]. A good starting point is boiling in citrate buffer at pH 6.0 in the microwave. Antigen retrieval is not needed for frozen sections, but the sections should be air dried for at least an hour prior to staining. De-waxing of FFPE sections in xylene and alcohol must be carried out prior to antigen retrieval and staining; following de-waxing, sections are rehydrated in decreasing levels of alcohol and then water.
| HEIR in Tris-EDTA buffer | PIER in Protease K buffer |
 |
 |
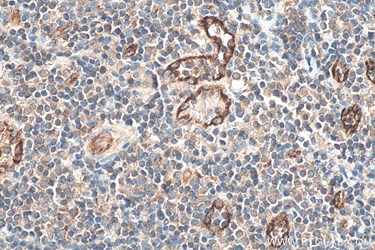
A comparison of different antigen retrieval methods in human tonsillitis tissue stained with VWF polyclonal antibody (27186-1-AP). Heat-induced epitope retrieval (HIER) was performed using Tris-EDTA antigen retrieval buffer (PR30002) and proteolytic-induced epitope (PIER) was performed using Protease K antigen retrieval buffer (PR30014).
Table 1: List of antigen retrieval buffers offered by Proteintech.
| Sodium Citrate Antigen Retrieval Buffer | PR30001 |
| TRIS-EDTA Antigen Retrieval Buffer | PR30002 |
| Protease K Antigen Retrieval Buffer | PR30014 |
3. Sample handling
Once sections are de-waxed and rehydrated it is important not to let them dry out! Use a specialized IHC staining tray to keep them in during incubations – many vendors sell these and they help keep tissue sections in a humidified environment. Alternatively, use a tray with tissue soaked in water.
Top tip: Use a PAP pen – a special marking pen that provides a thin film-like hydrophobic barrier when drawn around a specimen – to keep solutions close to the sections once the permeabilization step has been carried out. Its use is not entirely essential but can be useful. (Don’t add PAP pen before permeabilization or MeAc fixation as it may be dissolved by Triton or MeAc and will bind to your tissue.)
Learn more about Proteintech's Hydrophobic IHC pens.
4. Permeabilization
For most proteins, it is a good idea to add a permeabilization step to your protocol. Permeabilization may not be necessary for transmembrane proteins whose epitopes are in the extracellular region. Permeabilization involves incubation with a detergent (e.g. 0.1% Triton-X100 in PBS). Detergents can also act as surfactants, breaking through some of the protein cross-linking that occurs during formaldehyde fixing, therefore aiding antibody binding to the correct epitope [1] and reducing non-specific hydrophobic interactions.
Top tip: If staining isn’t working, try including detergent such as Triton-X100 at a lower level in all solutions (particularly for FFPE staining).
5. Blocking
The blocking solution binds to non-specific binding sites within the tissue, [1] thus preventing non-specific binding of the primary and secondary antibodies to tissue components. Sections are incubated with an ‘innocuous protein solution’ such as bovine serum albumin (BSA) or serum from the host of the secondary antibody – I usually start with 3% BSA solution for 20-30 minutes. Proteintech also routinely uses 3% BSA, but can also use 5-10% goat serum as an alternative (as the secondary antibody it employs is raised in goat).
6. Choosing your primary antibody
Your choice of primary antibody should depend on factors such as expression levels of the protein-of-interest and any other antibodies used in the case of co-localization. Antibodies from different species must be used in the case of the latter so that different secondary antibodies with unique conjugates can be used to distinguish between them. You must also choose whether a monoclonal or polyclonal is more suited to your needs; monoclonal antibodies give a highly specific signal whereas polyclonal antibodies can give a brighter one, particularly if expression levels of the protein of interest are low.
Table 2: Primary antibodies for IHC offered by Proteintech.
| Unconjugated Primary Antibodies |
| Biotin-Conjugated Antibodies |
7. Using appropriate controls
There is a chance of cross-reactivity and non-specific binding of other antibodies in the host serum. Purification techniques such as protein A/G purification, affinity purification or pre-absorption are used to prevent this from occurring. Proteintech affinity purifies all its antibodies with target antigen during product preparation; however, if you wish to carry out controls to test the specificity of primary antibody binding, a few options are set out below:
- The ideal control would be to use tissue that does not contain the protein of interest, for example: tissue from a knock-out mouse or cells where the target protein is knocked down i.e. with siRNA
- Western blotting is used to check that the antibody is detecting a protein of the right size. Multiple bands on a Western blot suggest non-specific antibody binding.
- Antibody specificity can be checked by pre-incubation of the primary antibody with the antigenic peptide (an adsorption test). This step is not necessary if the antibody is affinity-purified, as the specific peptide sequence is used for the protein purification [6].
- If the antibody is custom made, carry out Western blotting with serum from the various steps of the production process to determine whether the band representing your protein is detected by the correct fractions.
Learn more about western blotting.
It is also recommended setting up a primary antibody negative control for your samples in which the primary antibody is omitted, and the samples are incubated with the antibody diluent only. This is to ensure that the observed staining is indeed an effect of the antigen-antibody interaction and not due to any non-specific interactions.
Another important control to include is a tissue slide which will stain positively for the protein of interest and therefore, will confirm whether your IHC staining procedure is working or not in the event when no staining is detected in the target tissues.
8. Antibody dilutions
A guide for dilutions is usually provided with the antibody sheet, otherwise dilutions of 1 in 50 – 1 in 300 are good starting points for optimization; perhaps try a panel of primary antibody dilutions with a brand new antibody. Dilute the primary antibody in blocking solution (e.g. 3% BSA in PBS), then incubate for 1-2 hours at room temperature, or overnight at 39°F/4°C.
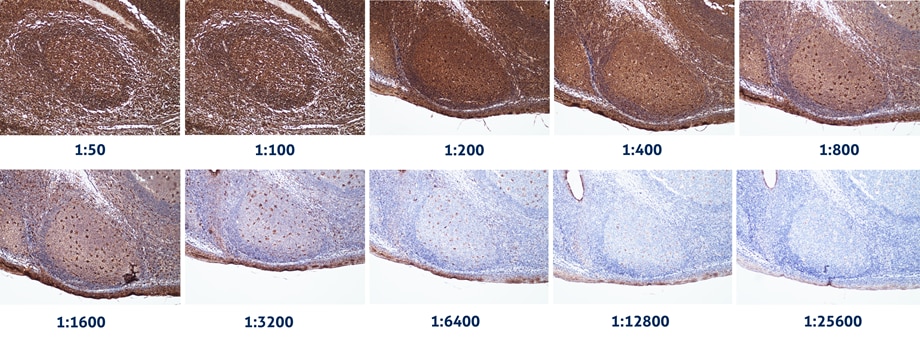
IHC analysis of human tonsillitis tissue stained with increasing dilutions of CD68 mouse monoclonal antibody (66231-2-Ig). Dilutions in the range of 1:3200 to 1:6400 was determined to be optimal based on the results.
9. Washing
Wash off the primary antibody with wash solution such as PBS. A quick wash followed by three 5 minute washes should be sufficient. Frozen sections can be quite fragile, so drop solution slowly next to the section e.g. with a 1 ml pipette.
Top tip: Alter the washing buffer to Tris-buffered Saline (TBS) rather than PBS.
10. Detection
Detection of the primary antibody is usually carried out with a secondary antibody directed against immunoglobulins of the host species of the primary antibody, conjugated to a fluorescent (e.g. FITC) or a chromogenic enzymatic tag (such as horse-radish peroxidase (HRP). Follow these tips for happy detecting!
- Background staining can vary between experiments, so it is a good idea to perform a negative control in which the primary antibody is omitted for each experiment.Background signal can also be an issue when using primary antibodies raised in mouse are used for staining mouse samples. To overcome this, try reducing the primary antibody concentration or shortening the secondary antibody incubation time.
-
Dilute the secondary antibody in blocking solution, usually at around 1 in 800 – 1 in 1000 dilution (although this can be adjusted in future).
For fluorescence experiments:
- Check that the fluorophore you intend to use is detected by your microscope. It is important to avoid spectral overlap of the fluorochromes tagged to the secondary antibody, cross-reactivity between secondary antibodies and bleed-through of the signal whilst imaging.
- Keep sections in the dark once fluorescent antibodies have been added to prevent bleaching.
- After incubation, wash the sections several times with PBS before adding mounting medium to the sections and carefully lowering a coverslip over the top.
- Lower the coverslip gently to avoid air bubbles. Take particular care with frozen sections, try not to squeeze or press the coverslip too hard as this may disrupt the tissue.
- It is possible to use primary antibodies directly conjugated to fluorescent tags. This saves time and reduces false signal but the level of signal will be lower. There are methods of amplifying low-level signals, including avidin-biotin-complex (ABC) and labelled streptavidin-biotin method (LSAB).
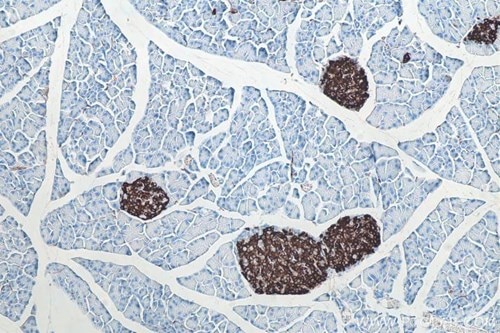
IHC analysis of mouse pancreas tissue using Insulin mouse monoclonal antibody (66198-1-lg) and IHC Detect Kit for Mouse Primary Antibody (PK10010).
Table 3: List of reagent kits offered by Proteintech for highly sensitive chromogenic signal detection during an IHC workflow.
| IHC Detect Kit for Mouse Primary Antibody | PK10010 |
| IHC Detect Kit for Rabbit Primary Antibody | PK10009 |
| IHC Detect Kit for Rabbit/Mouse Primary Antibody | PK10006 |
11. Counterstaining
Adding a counterstaining step after staining your slides with the primary antibody provides better contrast to IHC data and facilitates in depth analysis of the exact location of target proteins within complex tissue structures. The choice of counterstain primarily depends on whether you are using chromogenic or fluorogenic detection. While many counterstain options are available, the nuclear counterstains hematoxylin and DAPI are the most widely used for chromogenic and fluorogenic detection, respectively.
12. Suggested starting points for optimization
Don’t be intimidated by the many facets of an IHC protocol that could need optimization. Here’s a list of the first steps you should consider optimizing in the first stages of your IHC experiments:
- Antigen retrieval for FFPE sections
- Primary antibody dilution
- Blocking solution
Alternatively, you can consider using Proteintech’s target-specific, ready-to-use IHCeasy kits that have been pre-optimized by our experts to help you obtain high-quality IHC data. These kits contain all the antibodies and reagents that you would need for staining your tissues samples, including the primary body.
Explore all ready-to-use IHCeasy Kits.
If you would like to use your own primary antibodies for staining your tissue samples, Proteintech’s IHC Prep & Detect Kits are perfect for your needs.
 |
 |
|
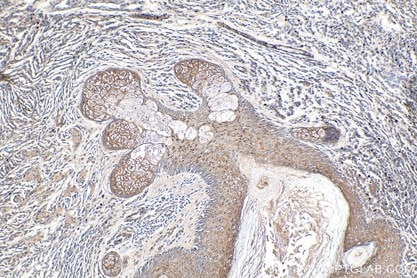
IHC analysis of human malignant melanoma tissue using NRAS IHCeasy Kit (KHC0279). |
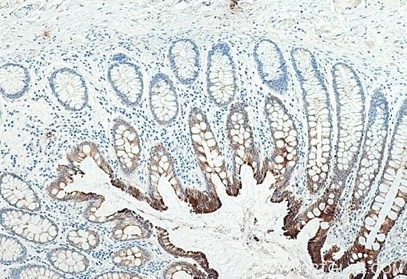
IHC analysis of human colon tissue using Cytokeratin 19 mouse monoclonal antibody (60187-1-lg) and IHC Prep & Detect Kit for Mouse Primary Antibody (PK10018). |
Table 4. List of IHC Prep & Detect Kits offered by Proteintech.
| IHC Prep & Detect Kit for Mouse Primary Antibody | PK10018 |
| IHC Prep & Detect Kit for Rabbit Primary Antibody | PK10017 |
| IHC Prep & Detect Kit for Rabbit/Mouse Primary Antibody | PK10019 |
References
1. Daneshtalab N, Doré JJ and Smeda JS, Troubleshooting tissue specificity and antibody selection: Procedures in immunohistochemical studies., J Pharmacol Toxicol Methods., 2010;61(2):127-35.
2. Shi SR, Liu C, Pootrakul L et al., Evaluation of the value of frozen tissue section used as "gold standard" for immunohistochemistry., Am J Clin Pathol., 2008;129(3):358-66.
3. Fox CH, Johnson FB, Whiting J et al., Formaldehyde fixation. J Histochem Cytochem., 1985;33:845–853.
4. Yamashita S et al., Heat-induced antigen retrieval: mechanisms and application to histochemistry. Prog Histochem Cytochem., 2007;41:141-200.
5. Shi SR, Cote RJ and Taylor CR, Antigen retrieval immunohistochemistry: past, present, and future. J Histochem Cytochem., 1997;45(3):327-43.
6. Saper CB and Sawchenko PE, Magic peptides, magic antibodies: guidelines for appropriate controls for immunohistochemistry. J Comp Neurol., 2003;465:161–163.

Related Products
Related Content
Mouse-on-mouse immunohistochemistry
Different methods of antigen retrieval
Troubleshooting your IHC experiments
Direct vs Indirect Immunofluorescence
Save time on your immunofluorescence experiments

Support
Newsletter Signup
Stay up-to-date with our latest news and events. New to Proteintech? Get 10% off your first order when you sign up.
Able™