
IF imaging: Widefield versus confocal microscopy
An overview of microscopy techniques and advice on when to use each method.
Summary
- Widefield microscopy is fast, easy to use, and cost-effective, making it a good choice for routine imaging and initial experiment screening.
- Confocal microscopy reduces out-of-focus light with a pinhole, giving sharper images and a better signal-to-noise ratio.
- Widefield works well for many standard applications, especially when speed matters, such as live cell imaging.
- Confocal is better suited to detailed applications like subcellular localization, colocalization studies, 3D imaging of thick samples, and stitching across larger specimen areas.
- When choosing between systems, consider sample thickness and target abundance—widefield is sufficient for bright, thin samples, while confocal is necessary for thicker sections or resolving faint signals against high background.
Introduction
Immunofluorescence (IF) is a technique used to visualize a protein of interest in its cellular context. It is based on staining cells with antibodies raised against a target protein that is directly conjugated with a fluorochrome or used together with fluorochrome-conjugated secondary antibodies.
Fluorescence microscopy is an imaging technique that uses fluorescent probes, dyes, or proteins (fluorophores) for sample labeling to generate an image. The image is based on the specific excitation of fluorescent molecules, where light is absorbed by a fluorophore and emitted at a longer wavelength.
Most fluorescence microscopes currently in use are epifluorescence widefield microscopes, where the excitation and detection of a signal are performed through the same light path (the objective). These microscopes are widely used in biology and are the basis for more advanced microscope designs, such as the confocal microscope (Figure 1).
Confocal and widefield microscopy
In a widefield microscope (Figure 1 A), fluorescence emitted by the labeled specimen is focused on the detector by the same objective that is used for the excitation light. The dichroic mirror acts as a wavelength-specific filter that transmits fluorescence to the eyepiece or a detector.
In a confocal microscope (Figure 1 B), light is emitted by a laser. A specific light wavelength passes through a pinhole and is reflected by the dichroic mirror toward the specimen. The pinhole allows only light from the plane of focus to reach the detector. This reduces the acquisition of out-of-focus light, thereby improving image quality (Figure 2). The excited fluorophore emits secondary fluorescence that passes through the dichroic mirror and is focused as a confocal point at the photomultiplier (PTM) detector pinhole.
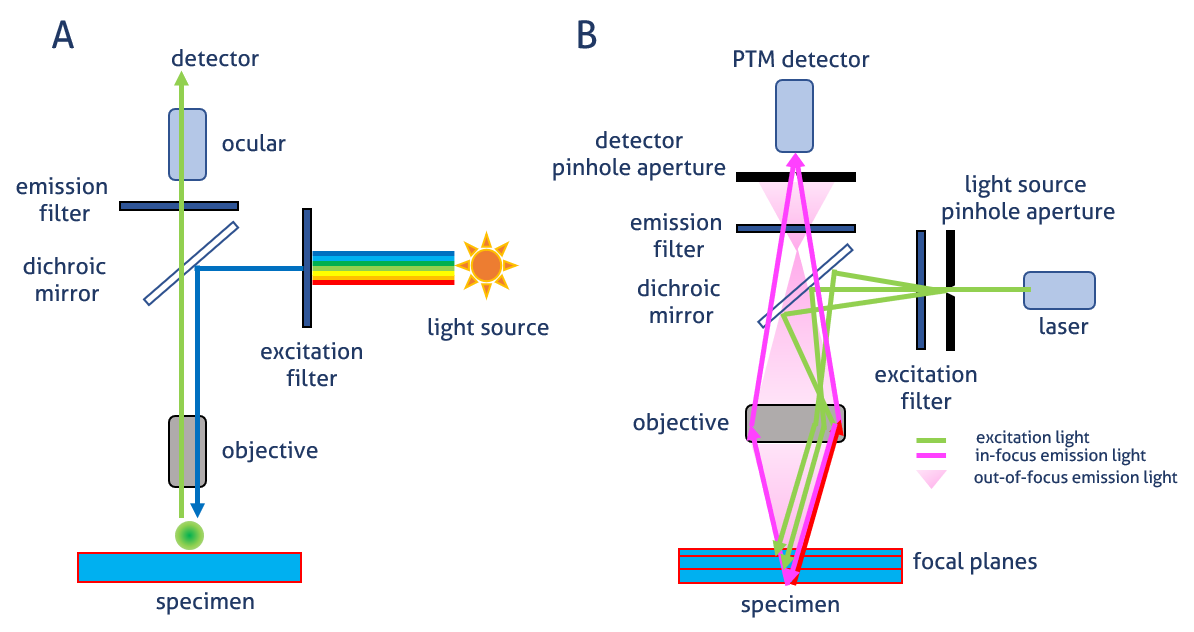 Figure 1. Image generation in widefield epifluorescence A) and confocal B) microscopes.
 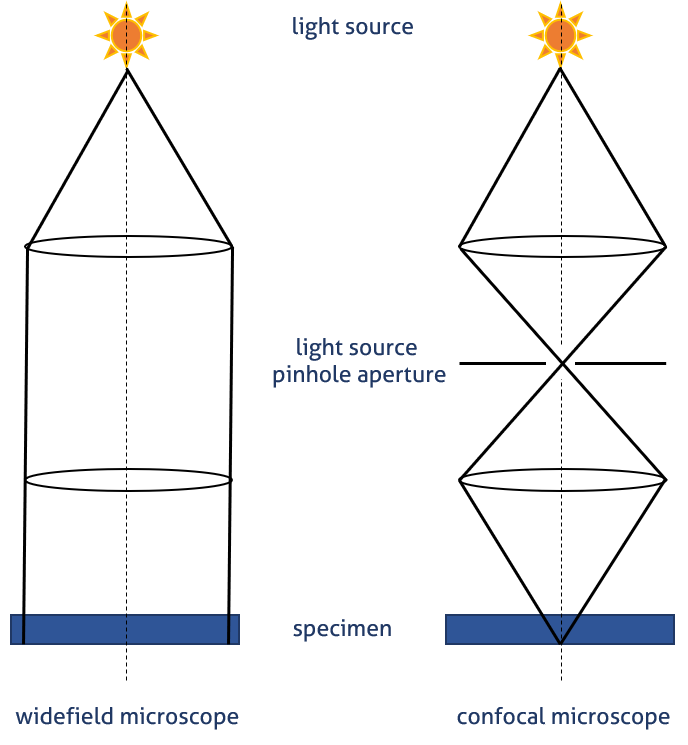 Figure 2. Light paths in widefield and confocal microscopy – visualization of the pinhole principle.
Confocal vs widefield microscopy: Advantages and disadvantages
A widefield microscope’s main advantages are that we get images quickly and can observe them directly in the ocular. The maintenance cost is low compared to the confocal microscope.
On the other hand, the widefield microscope carries a risk of high background. There is also the risk of channel-to-channel bleed-through (when fluorescent dyes have overlapping spectral profiles). Also, excitation wavelength bands depend on the filter sets available; this can be a limitation.
Using a confocal microscope, we can obtain a superior image quality and improve the signal-to-noise ratio. Due to light scattering, image blurring can be easily removed. A confocal’s flexibility in terms of excitation and emission of wavelength parameters reduces channel-to-channel bleed-through. Magnification can be adjusted electronically, and stitching across large surfaces of the specimen is also possible. A confocal microscope gives us a clear examination and 3D reconstruction of thick specimens due to effective Z-axis scanning.
However, it can be time-consuming to use a confocal microscope (depending on the scanning speed) and it has a more complicated image acquisition procedure compared to a widefield microscope. Also, confocal images are only obtained digitally from the PMT detector (the signal observed through the ocular lens is a widefield image).
Which microscope is best for my research?
For most uses, a widefield fluorescence microscope is sufficient and provides the best trade-off between quality, speed, ease of use, and cost. Therefore, it is a perfect tool for initial screens of protocols, and for live cell imaging applications where the speed of acquisition offers an advantage over scanning using confocal-based approaches (if the signal-to-noise ratio for a particular staining is sufficient).
It is generally considered good practice to verify the quality of staining of your samples for confocal microscopy using a widefield microscope first (Figure 3). For example, it is advisable to use a confocal microscope for subcellular localization or protein–protein interaction studies, colocalizations, 3D imaging of thick tissues, or larger surfaces of a specimen (stitching between fields). It is also compatible with multi-fluorescence imaging, time-lapse imaging, FLIM, and FRAP measurements.
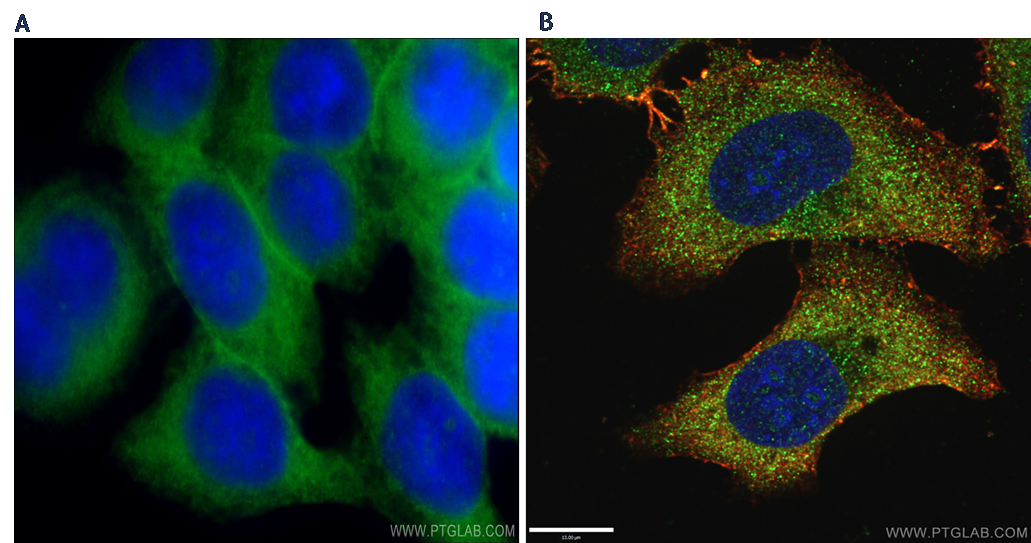 Figure 3. A) Immunofluorescent analysis of HeLa cells using SLC2A1, GLUT1 antibody (21829- 1-AP) at a dilution of 1:50 and Alexa Fluor 488-conjugated AffiniPure Goat Anti-Rabbit IgG(H+L) by widefield microscope. B) Immunofluorescent analysis of (-20°C Ethanol) HepG2 cells fixed using LAMP1 antibody (55273-1-AP) at a dilution of 1:50 and Alexa Fluor 488-conjugated AffiniPure Goat Anti-Rabbit IgG(H+L)by confocal microscope. DAPI was used as the nuclear counterstain.
Microscope setup & appropriate sample control panel
The setup of the microscope and appropriate sample controls are critical for IF imaging. Some important points to consider are listed below:
- Used fluorophores should have narrow spectral profiles of excitation and emission in order to reduce channel bleed-through when a multi-channel acquisition is planned.
- Controls and samples should be imaged side by side using identical settings to eliminate the background and false positive signal.
- You need to include the following set of experimental controls in each experiment:
- knock-out cells or tissue/cell line, positive and negative control
- sample stained only with secondary antibody
- in case of multiple staining, each antibody should be tested individually.
The microscope you choose depends on the nature of the individual experiment and the questions you wish to answer in the most efficient manner.
FAQs
Can widefield microscopy images be improved if I am getting high background or blurry images?
Yes. While high background is a known limitation of widefield microscopy, a computational approach called deconvolution can help. Deconvolution is a process based on digital contrast enhancement of acquired images through the computational removal of out-of-focus information and can partially correct for the blurring that results from out of focus light without requiring a switch to confocal imaging.
Does the confocal pinhole affect how much signal reaches the detector?
Yes, and this is an important practical consideration. Confocal microscopes require more sensitive detectors compared to widefield microscopes because most of the light is filtered out by the pinhole system, meaning the fluorescent light reaching the detector is much dimmer. This is why confocal systems rely on highly sensitive photomultiplier tube (PMT) detectors rather than standard cameras.
Does confocal microscopy cause more photobleaching than widefield?
This is worth considering when planning your experiment. Because most of the specific emitted light by the specimen contributes to the final image in widefield microscopy, samples can be imaged with less intense light, which limits photobleaching. In contrast, the intense laser light used in confocal microscopy can increase photobleaching over time, which is especially relevant during long acquisition sessions such as stitching experiments or Z-stack collection.
Does confocal microscopy actually improve resolution compared to widefield?
Confocal microscopy is often associated with better image clarity, but it is important to understand what is driving that improvement. Confocal microscopy provides only marginal improvement in both axial and lateral optical resolution but can exclude secondary fluorescence in areas removed from the focal plane from resulting images. In other words, the sharper appearance of confocal images is primarily due to the removal of out of focus background rather than a true gain in resolving power.
What type of fluorophores should I use for confocal microscopy?
Fluorophore choice matters more with confocal than widefield, particularly for longer imaging sessions. Synthetic fluorophores such as Alexa Fluor or CoraLite are brighter and more photostable, making them best suited for confocal imaging or low-abundance targets — especially when exciting a fluorophore over a long period of time, such as during stitching experiments, where bleaching is more likely to occur. Traditional fluorophores like FITC are less ideal for confocal applications.
Can confocal images be viewed through the eyepiece like widefield images?
No. This is a practical difference that is easy to overlook. Confocal images are only obtained digitally from the PMT detector; the signal observed through the ocular lens is a widefield image. This means that what you see when you look through the eyepiece of a confocal microscope is not the confocal image itself, and all confocal image acquisition and review must be done on a computer screen.
FAQs written by Jaela Caston, Graduate Student at University of California, San Francisco

Related Content
- Multiplexing with Same-Species Antibodies for Immunofluorescence
- CoraLite conjugated antibodies
- Advantages of CoraLite direct staining for IF
- Direct vs indirect immunofluorescence
- How to reduce autofluorescence
- Save time on your immunofluorescence experiments
- 9 Tips to optimize your IF experiments
- Conjugation of fluorescent dyes to Nanobodies
- GFP Nanobody for better images in immunofluorescence
- GFP and RFP-Booster for better immunofluorescence imaging
Support
Newsletter Signup
Stay up-to-date with our latest news and events. New to Proteintech? Get 10% off your first order when you sign up.