
9 Tips to optimize your IF experiments
Want to improve your IF experiments? Our 9 tech tips will help you achieve successful Immunofluorescence staining
Overview
Introduction to Immunofluorescence (IF)
Immunofluorescence (IF) enables the detection and localization of cellular proteins and other antigens via antibodies in their cellular or tissue context.
IF is a well-established technique. However, there are a couple of suggestions we might consider before starting the experiment.
IF Tip 1: Use the appropriate fixative for your sample
There are two popular classes of fixatives: aldehydes and organic solvents.
Aldehydes (formaldehyde or glutaraldehyde) are appropriate for double labeling of membrane-bound and cytoskeletal antigens. They are recommended for nuclear and mitochondrial proteins.
|
Recommended fixation step: 10–20 minutes at room temperature (RT) incubation with 2%–4% paraformaldehyde (PFA), Figure 1. |
Please note:
This method modifies proteins chemically, which can destroy antigens.
Fixation using aldehyde may require a “quenching” step to reduce autofluorescence resulting from aldehyde reactions with amines and proteins.
Tissues require longer aldehyde fixation treatment than cell culture.
Organic solvents (methanol, ethanol, or acetone) act by dehydrogenation and protein precipitation. They are recommended for use with monoclonal antibodies that are only binding to one epitope within internal protein structures.
Methanol is best for frozen samples. It preserves cellular architecture and stabilizes the secondary structure of proteins. However, water-soluble and lipid components might be lost.
Acetone is a strong dehydrating agent. It can cause irreversible precipitation of tissue proteins. It is better than methanol for histological preservation. When working with acetone, no additional permeabilization steps are needed.
 |
|
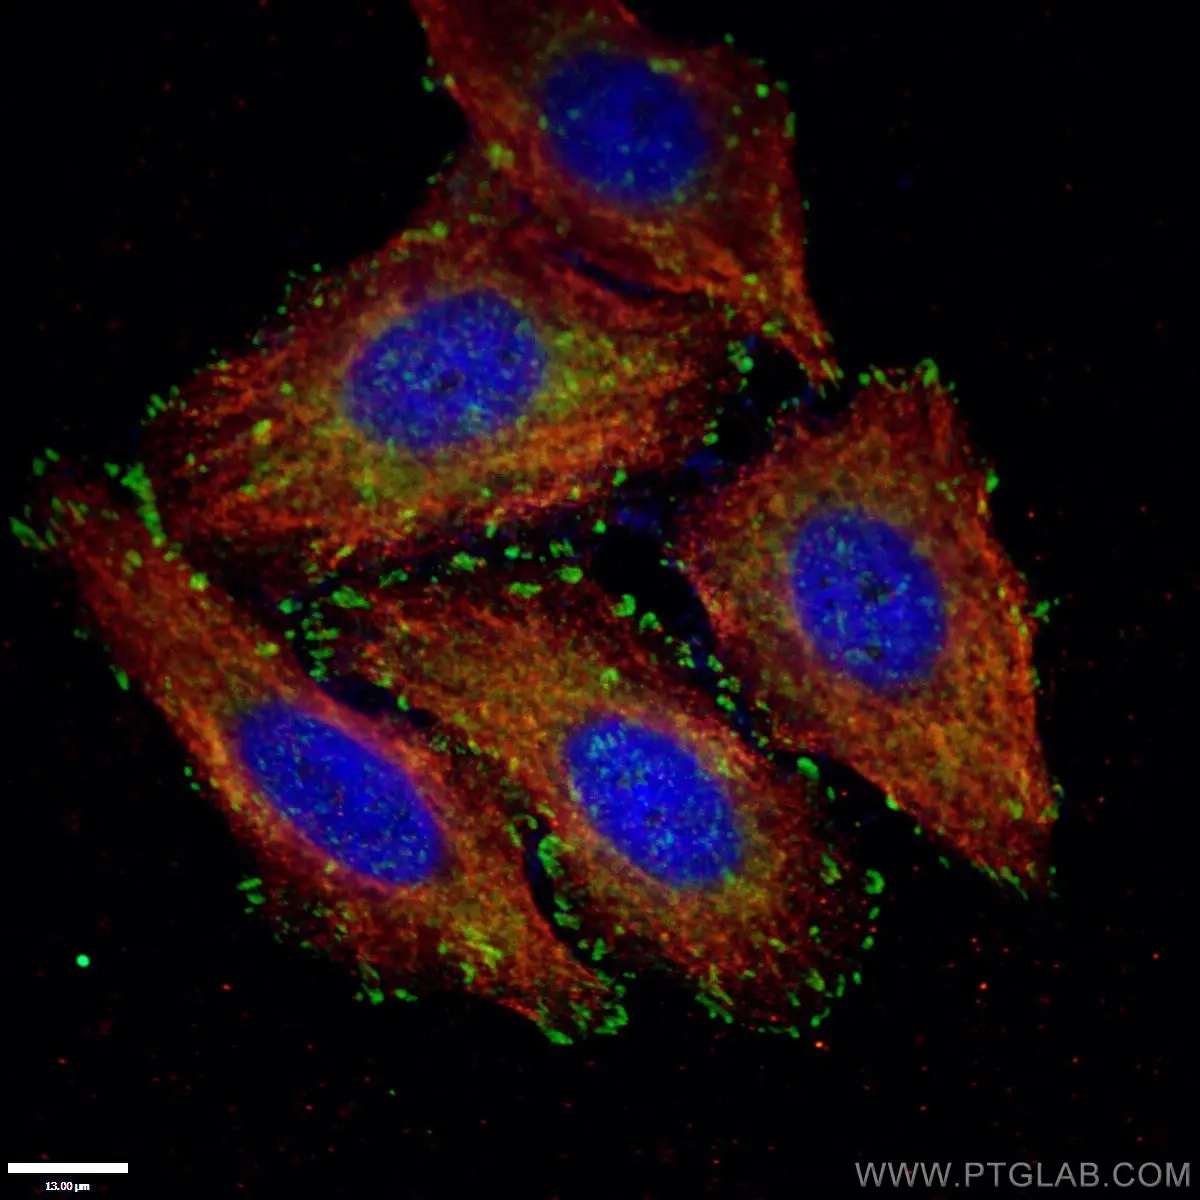
Figure 1. Paxillin Antibody staining (10029-1-Ig; 1:50; green) with HepG2 cells. Cells were fixed with 4% PFA, permeabilized with 0.2% Triton X-100, and co-stained with Tubulin (66031-1-Ig; 1:100; red), under 40 x. |
IF Tip 2: Choose the right detergent to stain your target
- Aldehyde fixation requires the cells to be permeabilized to allow antibodies access into the cells.
- Organic solvent-based fixation does not require this step.
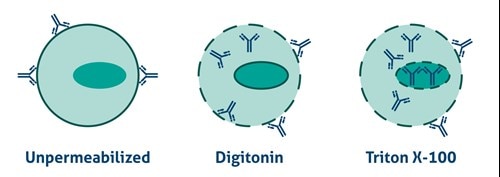
Antibodies cannot cross the plasma membrane of aldehyde-fixed unpermeabilized cells. To access intracellular targets, mild reagents such as Digitonin, Leucoperm, and Saponin are needed. To enable staining of interior membranes (e.g., nucleus, mitochondria), stronger non-ionic detergents such as Triton X-100 or NP-40 are recommended (Figure 2).
|
Recommended Permeabilization Step: - Cytosolic targets ¬– 10–30 min RT incubation with 0.5 to 1 mg/mL mild reagent, prepared as a stock in DMSO - Targets within interior membranes – 10 min RT incubation with 0.1%–0.2% Triton X-100 in PBS |
 |
|
Figure 2. Antibody Accessibility with Unpermeabilized Cells and Mild (Digitonin) and Strong non-ionic (Triton X-100) detergent Permeabilized Cells. |
Please note:
SDS is a useful permeabilizing agent to induce slight denaturation of fixed cells to reveal epitopes that may be masked from an antibody. It can extract small, poorly cross-linked proteins. However, it should not be used on samples fixed by precipitation (e.g., with methanol).
IF Tip 3: Use appropriate controls
Use proper negative controls to verify the specificity of the staining.
Include:
- Slides stained only with secondary antibody (to determine the threshold of background signal)
- Slides with cells lacking the antigen of interest
IF Tip 4: Optimize dilution and cell density
Choose a number of cells that will result in about 50% cell confluence at the time of staining.
- When cell density is too high, cell architecture is deformed and may effect higher background at low magnifications.
- When cell density is too low, it is more challenging to find the field with the optimal cell pattern.
Special Coating Circumstances
- Non-adherent and weakly attached cells are difficult to grow on glass surfaces. In this case, coat the coverslips with poly-lysine or extracellular matrices (e.g., collagen or laminin)
- Some tissues (e.g., blood vessels or brain samples) may require gelatin-coated or poly-lysine-coated slides to remain attached to the slide after multiple wash steps.
Please note:
1 μg/mL of purified antibody or 1:100 to 1:1000 of anti-serum should be enough to achieve specific staining. It is a recommended that you perform a titration experiment to optimize the antibody dilution.
IF Tip 5: Use blocking serum from a different organism than the primary antibody
One-hour incubation at RT with either (1%–5%) Bovine Serum Albumin (BSA), milk powder, or serum is recommended as a blocking buffer.
Please note:
It is important that these blocking proteins do not originate from the species in which the primary antibody was raised. Otherwise, the secondary antibody’s specificity to the primary antibody will be lost.
For example, if your secondary antibody was produced in goat against a mouse primary antibody, normal goat serum would be suitable.
IF Tip 6: Primary and secondary antibody optimization
Usually, the primary antibody incubation times are 1 to 2 hours at RT or overnight (ON) at 4 °C in the dark.
Both antibodies (primary and secondary) should be diluted in the blocking buffer.
- In direct IF, you can directly continue with sample mounting, as the primary antibody already brings its fluorochrome.
- In indirect IF, additional steps are needed for the labeled secondary antibodies to bind to the primary antibodies.
Please note:
A crucial point here is extensive washing after incubation with the primary antibody to reduce unspecific binding due to the secondary antibody.
IF Tip 7: Multiple staining step (optional)
- Each primary antibody should be generated in different species. It is then possible to use secondary antibodies conjugated to fluorophores detected by separate channels.
- Alternatively, samples can be double stained sequentially, in which case all blocking, primary, and secondary incubations are completed first for one antigen and then performed for the second one.
IF Tip 8: Employ counterstains to help identify cellular landmarks
Counterstains are used for two different purposes:
- To reduce background fluorescence
- To identify cellular organelles and provide information regarding signal localization.
The most common nuclear counterstain dyes are DAPI (diamidino-2-phenylindole), Hoechst 33342, propidium iodide (PI), and Far Red Draq5.
Recommended incubation for nuclear counterstains:
RT 5 min incubation with 0.1–1 μg/mL nuclear stain dye and further extensive PBS washing (Figure 3).
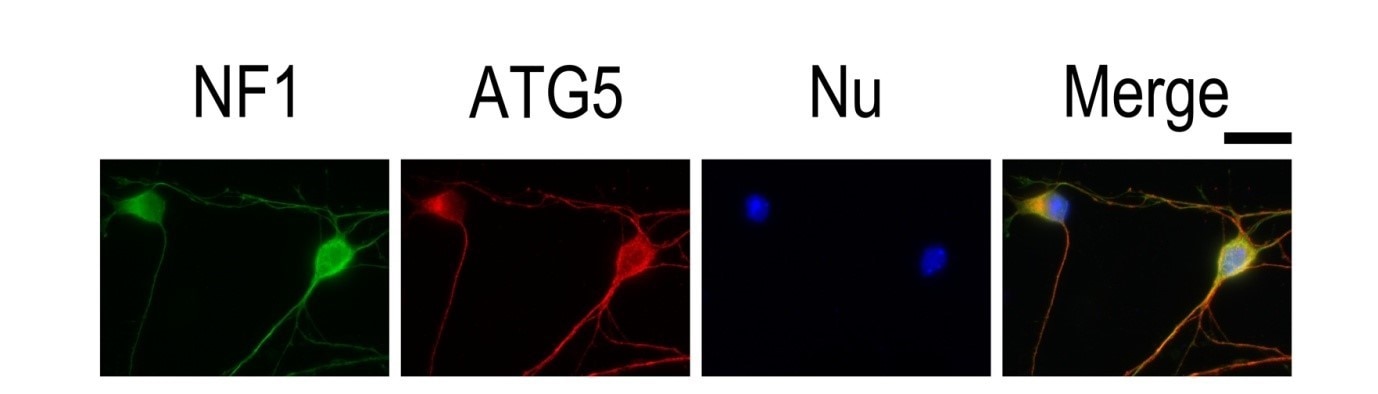 |
| Figure 3. IF result of anti-ATG5 antibody (10181-2-AP; 1:50) with E15 mouse cortical neurons. The cells were co-stained with the NF1 antibody (green), under 40 x. Cells were fixed with 4% PFA and permeabilized with 0.2% Triton X-100. |
IF Tip 9: Get proper sample mounting
Mount coverslip/tissue samples with a drop of mounting medium. Next, seal the samples with nail polish to prevent drying and movement under a microscope (Figure 4). After microscope analysis store in the dark at -20°C or +4°C.
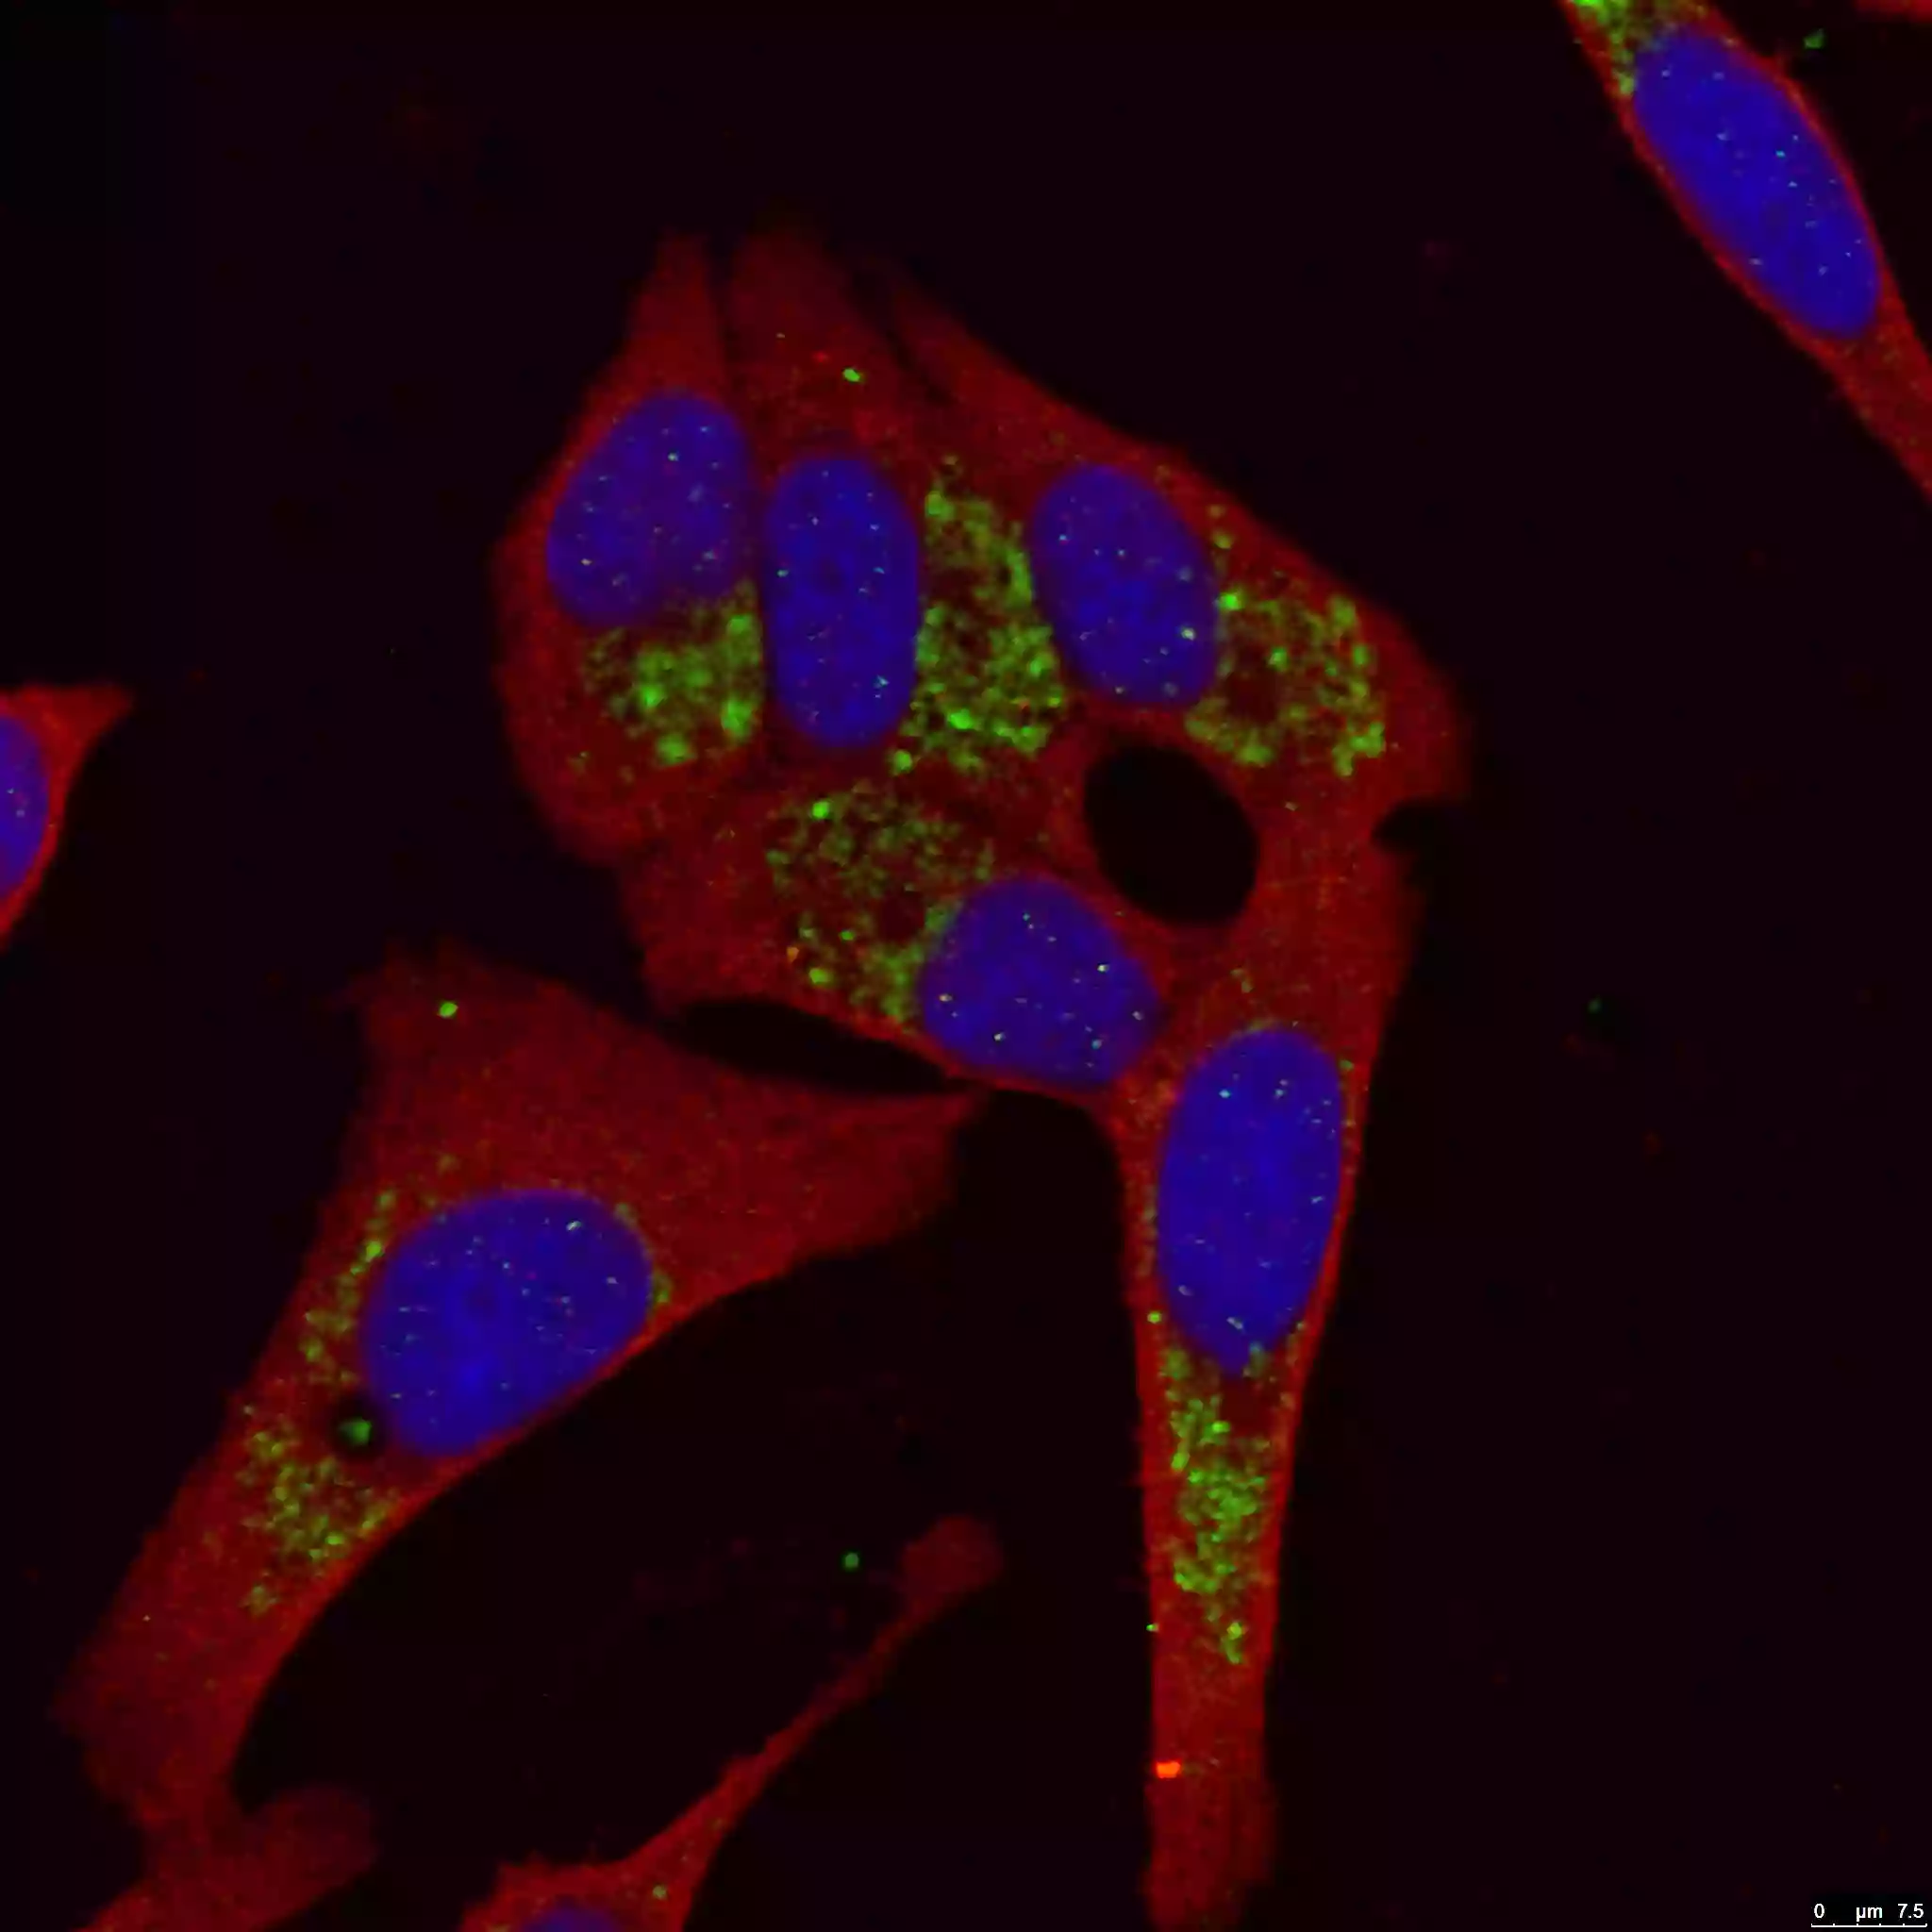 |
| Figure 4. LC3B-Specific Antibody staining (18725-1-AP; 1:50; green) with HepG2 cells. Cells werefixed with 4% PFA, permeabilized with 0.2% Triton X-100, and co-stained with Tubulin (66031-1-Ig; 1:100; red), under 40 x. |

Related Content
How do I know if the antibody will cross-react?
IF imaging: Widefield versus confocal microscopy
Dying to see what's inside: Staining organelles
How to reduce autofluorescence
Want to upgrade your immunofluorescence workflow? Go Direct!
Why are recombinant Nanobodies/ VHHs beneficial?
How to write a good scientific abstract?
Learn how to save precious hours on your IP, IF, and western blotting experiments
Support
Newsletter Signup
Stay up-to-date with our latest news and events. New to Proteintech? Get 10% off your first order when you sign up.
Able™